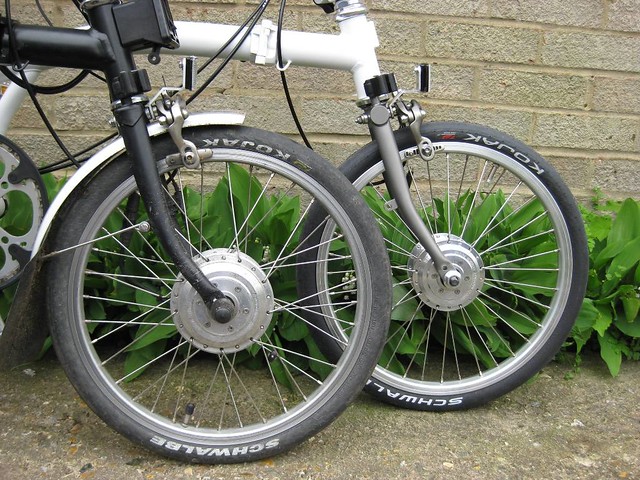
New Super Light Tongxin Motor Design/Kit

jerrysimon

Esteemed Pedelecer
Aug 27, 2009
3,292
112
Cambridge, UK
Lukas,

You are going to have to wait about a week until I finish building this wheel and fit it. Only got it a few days ago.

Assisted speed on the flat will be 15mph for this 260RPM version in a 16" rim. You will need to to get the correct RPM for the wheel size you want to fit it too.


Regards

Jerry.
 

jerrysimon

Esteemed Pedelecer
Aug 27, 2009
3,292
112
Cambridge, UK
Ok now we are getting some where.

Motor laced not yet tensioned/trued up. In the end I had to go for alternate spoke head in/out to take account of the alternate hole counter sinking. Still radial though.


As highlighted there was concern that the outbound spokes may not clear the fork tubing, but it was ok phew..


I had to put a new connector on the power lead which was strangely a single core wire with an outer sheath ?

I guessed (not a good idea) that the center core was positive. Not sure how you would check anyway ?


I am just uploading a Youtube video to show an initial test in current Brompton forks, of the motor/controller using the pedelec function. I have a surprise in store which caught me unaware!
 
Last edited:

daniel.weck

Esteemed Pedelecer
Aug 8, 2009
1,229
2

jerrysimon

Esteemed Pedelecer
Aug 27, 2009
3,292
112
Cambridge, UK
Ok here is the video of it working. The wheel is not yet tensioned/trued but it gives you an idea of how it all works. The pedelec disk seems to fit but will need a slight modification to make sure it does not foul the BB. The pedelec sensor, or whatever is called, should fit stuck to the bottom of the frame, (where I have duck taped it), though will probably have to be epoxied on.


[video=youtube_share;-xiSQzxM_pk]http://youtu.be/-xiSQzxM_pk[/video]


The motor seems fairly quiet and the pedelec function is smooth up and down the different cadence rates.

Ok the real surprise (for me anyway) and much to the humor of my wife when I was talking on the video, is that the motor itself seems to have some intelligence/built in circuit that arms when you supply power to the controller. This will probably rule out using another controller with throttle. At first I thought it was coming from the controller but the arming sound is definitely coming from the motor. In my RC model aero hobby I have seen brushless controllers make this arming sound, but as I said it seems strange that there in something in the motor itself ?

Anyway its all looking good so far :)


Regards

Jerry
 
Last edited:

laroche

Pedelecer
Apr 16, 2012
30
0
Jerry

Most interesting! Nice to see it working well.

There may be glue on the sensor already. If there's a small white plastic sheet on one side of the sensor, try peeling it back. On mine, there's glue beneath. I'm not inclined to trust it though; 'belt and braces' seems the way to go.

Did you feel the front wheel stopped a bit quick after the pedals stopped turning? It seems like that on the video, but hard to tell.

Cheers!
 

daniel.weck

Esteemed Pedelecer
Aug 8, 2009
1,229
2
The pedelec disk seems to fit but will need a slight modification to make sure it does not foul the BB. The pedelec sensor, or whatever is called, should fit stuck to the bottom of the frame, (where I have duck taped it), though will probably have to be epoxied on.
Yep, the plastic disc normally rotates firmly with the steel axle (by virtue of a basic friction-based gripping mechanism), but because of the Brompton tight fit, the PAS disc fouls the bottom bracket's plastic screw-on cup => I removed some material to make the disc thinner (well, to the extent that the embedded steel magnets allow), and although I was tempted to use silicon grease as well, in the end I thought the lubricant would spread and compromise the friction between the disc and the steel axle, so I refrained.

As for mounting the sensor: I bent the soft steel ring so it wrapped around the bottom bracket's enclosure, and I secured it using plastic straps.

I can't wait to hear how it feels to ride :)
Cheers, Dan
 

jerrysimon

Esteemed Pedelecer
Aug 27, 2009
3,292
112
Cambridge, UK
Did you feel the front wheel stopped a bit quick after the pedals stopped turning? It seems like that on the video, but hard to tell.
Maybe not sure. I did notice if you speed up the motor at full cadence and then stop, it does bring the motor to a standstill fairly abruptly. The controller seems to be more intelligent or interacting with the motor better and more smoothly than the stock Tongxin one, in terms of smoothly increasing and decreasing speed of the motor dependent on cadence speed and shutting off the motor. Maybe this is all normal for the pedelec option ?

As I said I am new to pedelec usage as I am up to now a throttle jockey :p

I forget to check freewheel though probably need to ride it to check that properly.

Re glue, yes my pedelec sensor strip has the glue on it underneath the white tape, but as you say going to need something a little more permanent. Five min expoxy should do the trick.

Regards

Jerry
 
Last edited:

jerrysimon

Esteemed Pedelecer
Aug 27, 2009
3,292
112
Cambridge, UK
I can't wait to hear how it feels to ride :)
Thanks Dan. I think the pedelec parts are slightly different on this. Going to be another week or so before I can sort it out and test ride it. I might try and set it up on the current Brompton which will speed up a first test ride.

Regards

Jerry
 
Last edited:

daniel.weck

Esteemed Pedelecer
Aug 8, 2009
1,229
2
[video=youtube_share;-xiSQzxM_pk]http://youtu.be/-xiSQzxM_pk[/video]
LOL, I've only just realised about your daughter/wife's giggles towards the end of the video footage! :D
I can see how the non-initiated (i.e. non-geek) finds it funny that an electric motor can have some "intelligence" built in!! ;)

Cheers, Dan
 

jerrysimon

Esteemed Pedelecer
Aug 27, 2009
3,292
112
Cambridge, UK
My wife, though my daughters find my geekness equally amusing until of course I converted my eldest daughter's bike to e assist when she developed M.E :)

Regards

Jerry
 

neptune

Esteemed Pedelecer
Jan 30, 2012
1,743
353
Boston lincs
@Jerry. When you talk about the power lead [conductor with screen] is this the lead from the battery? If it is, you can easily determine its polarity by using your multimeter on a suitable DC volts scale. Put the multimeter red lead on what you thinks is positve. If you guessed right , meter will just show the voltage. If you guessed wrong, then the voltage will be preceeded by a minus sign . Careful not to short circuit the battery. Hope I understood the question.
You may be able to improve the spoke clearance by doing your own countersinking on the hub flanged . Just use a large sharp drill bit held in your hand. Don`t get too greedy with it. Make sure there is enough "Meat" left so that flange strength is not compromised.
I have mentioned this before. I f we could build an oscillator with a square wave output, powered by a small battery, driving a small electromagnet, we could place it next to the pedal sensor. A potentiometer could control the frequency, and act as a throttle.
 
Last edited:

jerrysimon

Esteemed Pedelecer
Aug 27, 2009
3,292
112
Cambridge, UK
Neptune yes that is the power lead but its coming "from" the controller to the battery so no voltage on it to measure until after you connect it up!

Some controllers do have a polarity safety for connecting up the wrong way round, but not an ideal way to test it. As I said hard to determine without plugging it in. I was fairly confident that the centre was positive though. Interesting about the throttle but most of that went over my head lol

The countersinks don't really need drilling out any more in fact the opposite if you want all the spoke heads facing out then the larger countersinks need to be reversed on the outside of the flange i.e. all smaller counter sinks on the outside of the flange and larger ones on the inside.

Alan (catsnapper) was helpfull as always and suggested another viable way forward would be to put spoke head washers in the larger countersunk holes on the outside.

This then would probably mean though that the inside holes would have to be enlarged to free up the spoke curve wich as you say has the potential to further weaken the flange :(

Going to spoke heads in/out to keep it radial seems the best compromise. Of course when crossing spokes the holes are suitably drilled.

At least I have learnt that the larger countersink is for the spoke curve not the head :eek:

Having said that I checked one of my existing Brompton wheels and I have indeed put spoke heads in the larger countersunk holes and you can see daylight on some of them. But then again its over two years old with 3500 miles on it, so it can't have been that bigger of a mistake.

Whilst some care obviously needs to be taken when building wheels, I think is not an exact science (or maybe it is) and in this application we often can get away with it more than perhaps a high performance, lightweight, racing machine.

Regards

Jerry
 
Last edited:

jerrysimon

Esteemed Pedelecer
Aug 27, 2009
3,292
112
Cambridge, UK
Progress has been slow mainly because I have been plucking up courage to take my dremel to a £270 set of Brompton Titanium forks!

Anyway I have started now so there is no turning back :p

I had considered chickening out and getting a set of steel forks, but that kinda defeats the object really. Spreading the forks seemed easier than the steel ones mainly as the Ti seems to be springier anyway and once spread a little, they can easily be pulled apart the 4mm or so each side. Anyway I am glad I had already done this with a set of steel forks on my current steel model, as I now know how to do it with the minimal amount of metal removal. On my current Brompton I used the anti turn washers supplied with the motor whereas this time I am using the original Brompton ones enlarged to fit the 9.75mm motor shaft flat.

May be able to report back in a few days.

Regards

Jerry
 
Last edited:

shemozzle999

Esteemed Pedelecer
Sep 28, 2009
2,826
686
Hi Jerry,

My Brompton front fork assembly:

I used a thicker anti-turn spacer either side of the motor supplied by Matt Widgery at TETS (you have a smaller sized diameter motor shaft to mine and would have to spec it if you wanted some) which gave me more fork/motor spacing, they were used in place of the original motor washers, I had to file down the anti-turn tabs to make them flush with the thickness of the forks.
On the outside of the fork I too used the supplied anti-turn washers filed to fit the motor shaft and located them in the holes in the fork, placed over them, a custom made aluminum spacer made by TETS which fits over the outside profile of the fork and is recessed to contain it securely.
I also opened up the hole in the supplied mudguard wire washer to fit the motor shaft followed by a standard washer and finally the stepped shaft nut when re-building my Brompton.

S7300644.jpg

S7300645.jpg

S7300646.jpg

S7300647.jpg
 
Last edited:

jerrysimon

Esteemed Pedelecer
Aug 27, 2009
3,292
112
Cambridge, UK
Took a day off work. I really wanted to crack the back of this job and have been prevaricating too long, or maybe just getting the process right in my head :p

Nearly five hours (about one tensioning up the wheel) later and the wheel is finally fitted. I had a little test ride of it unpowered just to see how it rides. All seems good. I haven't swapped the 3 speed hub out for the lighter 2 speed yet but it weighs in at around 11.6kg. Should go down to just over 11kgs. That will be a good 3kgs lighter than my current Brompton. Hopefully I might get a test ride over the weekend, once I get chance to fit the pedelec ring and sensor tomorrow.

I will post a couple of pictures of where I have got to. Ti is hard to work with, but my dremel got there in the end. I had to take it really slowly as I wanted to remove the minimum amount of material from the fork dropouts as I could. Spreading the forks is no easy feat either as the Ti tends to want to always spring back to its original shape. Definitely harder to work with than the steel forks.

PS thanks for the pics shemozzle999. I managed to modify and get the existing Brompton washers to work, though the one for the stay now won't allow the stay loop to sit in it, should have guessed duh. Its no problem though as I am going to use stock flat ones (I have a spare) on both sides. Everything is a pretty tight fit to get this motor on the Brompton. The clearances are very close. Lacing it radially with spoke heads all out would make it easier. I think that would be possible using washers under the spoke heads on the larger counter sinks, however I seem to have managed to have found a fit :)

Regards

Jerry
 
Last edited:

jerrysimon

Esteemed Pedelecer
Aug 27, 2009
3,292
112
Cambridge, UK
Well got my first test ride today.

There is still lots to do and this was really a test to see how it all works. The good news is it does work, though the installation has proved much more challenging that I initially thought.

Here are some pics first to compare the motor sizes fitted to both Bromptons.

Drive Side


Other side


From the front


Regards

Jerry
 
Last edited:

jerrysimon

Esteemed Pedelecer
Aug 27, 2009
3,292
112
Cambridge, UK
Here it is set up in its test rig config with controller/wires just lashed up. Obviously all the wires will be hidden later as will the controller which will again be in the front bag like my current Brompton with an umbilical to connect it all up.


Points of note

1. Setting up the pedelec is a real challenge. The sensor itself prefers to be sited in one position only, which fortunately is where it fits best anyway. In some positions (like on top of the BB rather than underneath) it will only start the motor when you pedal backwards ?

2, The pedelec disk that goes on the crank shaft needed to be modified quite a bit to make it fit. Although it will fit on the Brompton, I think this will be a real problem for some bikes as stated. Is it possible to fit other pedelec sensors or are they all specific to controllers ?

3. I am not use to the pedelec function up to now only ever using throttle control and feel when I ride I need a cutout brake to stop it ? It kicks in when you pedal but take a few moments to stop when you stop pedaling and the motor is still running for a few moments which would be a problem if you needed to brake ? (I need to do as separate post about this as I really don't understand the pedelec function/setup). Anyway apart from that when riding power input is progressive and smooth as you increase cadence.

4. The motor is almost silent or at least seems to be when riding and barely noticeable, in fact sometimes its hard to know if the motor is on except for the assistance it is providing. The motor does however hate going backwards and there is a LOT of resistance, more so that the current Tongxin Nano.

I will post some more pics of the pedelec sensor fitting later.

Regards

Jerry


2. Th
 
Last edited:

cwah

Esteemed Pedelecer
Jun 3, 2011
3,048
179
www.whatonlondon.co.uk
Really really nice job Jerry. Now the forum is full of brompton guys ;)

Do you really feel the difference with 3 kg removed from the bike? And how's the torque of this little motor?

This set up is almost a bike without motor lol
 

laroche

Pedelecer
Apr 16, 2012
30
0
Excellent!!

Lots of issues...

The business about the sensor responding only to back-pedalling if located anywhere but underneath the BB seems weird - almost freaky!

It also highlights another problem. Where a front derailleur cable runs under the BB (the most common arrangement on full-framed bikes) the sensor will not fit without either some sub-BB modification (far from straightforward) or the replacement of the bottom- for a top-pull system. (A rear derailleur cable run under the BB should not be so difficult because it is on the drive side.) Bearing in mind the BB/crank set-ups on almost all modern bikes (aside from the cheap and cheerful) are also incompatible with it, very few quality bicycles will accept this kit without grief and expense. The disk will not even fit an Alfine crank (the hub gear is OK, just don't get the crank as well), never mind nearly all the derailleurs! Unless the design of the pedal sensor is changed, I suspect the kit will see little useage on anything other than folders, which almost all use square taper BBs and never(?) bottom-pull front derailleurs.

Cheers!
 
Last edited:

jerrysimon

Esteemed Pedelecer
Aug 27, 2009
3,292
112
Cambridge, UK
Thanks Laroche. I have set up a new post to cover pedelecs in terms of how it works and how they are fitted.

As I said the fitting of this one has been pretty challenging.


Do you really feel the difference with 3 kg removed from the bike? And how's the torque of this little motor?
Its about 50W less than the other Tongxin Nano motor so I guess torque will be less but Tongxins are renown for being good hill climbers in small wheels. I have only been round the block which is flat and have not yet tested it on a hill. Weight wise for me, its all about carrying so 3kg off the weight will mean easier to carry bike folded in and out of shops etc.

Free wheel seems good very similar/the same as the existing Nano motor

Regards

Jerry
 
Last edited: