Trek / CST motor / Hydraulic Disc Brakes / Cassette

103Alex1

Esteemed Pedelecer
Sep 29, 2012
2,228
67
A cheap, solid wrecking bar like thisRoughneck Wrecking Bar 18" : Tooled-Up.com plus a scrap length of chain wrapped round the cassette and hooked into the end of the wrecking bar makes an indestructable chainwhip.

Combine this with a cassette removing tool with a 1/2" drive to take a 12" (or thereabouts!) bar to defeat most stubborn cassettes.
Total cost is about £12.

Alan
Much more like it cost-wise ! Just been to a different local bike shop to get an inner tube for the back wheel and decided to be cheeky and take the wheel along strapped to my pannier rack ... they loosened it for me gratis. That's a shop I'd be happy to go back to :D.

They used something pretty much exactly as you describe and confirmed it had been over-tightened considerably more than it should have been. Happy days - the cassette is in good nick so definitely can be moved to a new hub now.
 

103Alex1

Esteemed Pedelecer
Sep 29, 2012
2,228
67
The seatpost clamp is rigged up to take a rack fitting (just swapped over). I can fit a Topeak Super Tourist Rack with MTX built for disc brake wheels which will be compatible with the wheels on the bike at the moment. Will fitting a wheel with built-in CST hub be compatible with that sort of rack if I wanted it on when using the bike in "eBike mode" ?
No reason why the rack should have any effect on the rear wheel, I'd have thought.
Don't forget a good torque arm, which would be essential if you don't deepen and advisable if you do.

...

That rack sounds perfect, but you might want to adjust the legs to get the battery just above the wheel and tight against the seat-post for best handling. Look at Saneagle's Kraken.
I collected the rack this afternoon and fitted it now using the extender-arms supplied with the rack to the swapped out seatpost clamp designed to accommodate rack fixings. Would have preferred it in silver to match the frame but they only do the version for disc brakes in black :

20130118_003935[1].jpg

Absolute bargain from Halfords - 20% off on-line purchases and their item description of this is actually out of date ... the correct Super Tourist DX Rack w/o spring (disc) came against the item and total bill was just over £25.

http://www.halfords.com/webapp/wcs/stores/servlet/product_storeId_10001_catalogId_10151_productId_753241_langId_-1_categoryId_236256

Great thing is it's compatible with my existing MTX rack bag from the other bike, and also my panniers, so I can slide that on the MTX track and actually carry stuff now, and also switch all the bags between the 2 bikes. Very useful and definitely want to site the battery away from the rack if possible.

The only thing I hadn't worked out before fitting it is that these sorts of racks fix into the holes in the frame above the dropouts. So ........ as regards the torque arms, where do they fix now ? Close-up of cassette-side :

20130118_004146[1].jpg

I also tried out riding the bike with a backpack (had little choice to get it up to Halfords as no other way to carry stuff on the way there). Nothing ventured nothing gained. Aim was to give it a proper go to test practicailty of going down the rack-mounted battery route and carrying stuff on my person instead as a 'norm'. Used my waterproof Overboard roll-top backpack with chest strap fixed to stop it swaying. It's the smallest backpack I have that could be of any practical use for the stuff I want to be able to take about and if taking stuff for the sea would still be very tight indeed volume-wise. Probably the greatest length too that I could get away with for my height.

Comfort-wise, wasn't as bad as I had expected, but wasn't fully loaded. Still far preferred the ride out this evening free of bags about my person. I like riding with as few clothes and other encumbrances as I can get away with :p

There was another unexpected side-effect of having the backpack on .. had great difficulty seeing behind me properly when I turned around in traffic. I have a small frame (personally !) and this means that I couldn't see past it properly. Not keen to fit mirrors on to this bike - they're of very limited use anyway and the one on my other bike may well come off soon as I never use it any more.

This bike is a true hardtail MTB and not a hybrid.. I actually tend to ride quite 'tucked' if I take it on roads - helps the speed a bit especially unpowered :). This actually made the visibility worse. So I am veering back strongly to a solution mounting a battery within (or, having seen pictures of the Grace bikes, under) the frame triangle.

Another discovery on a longer (7 mile) ride with hilly stretches - the handlebars are pretty uncomfortable. Probably a case of not having gloves with gel pads in the right places on but warmth was the no. 1 priority today in the snow. I am therefore now wondering whether an ergonomic 1/2-twist throttle set would be a good investment for comfort on longer rides. Anyone with recommendations for these ?

The development process continues .... :cool:
 
Last edited:
D

Deleted member 4366

Guest
I prefer thumb-throttles to half-twist: They don't break when you go over a big bump; they fit under your shifters; more stealthy.

That rack looks too far back for a sizeably battery. For best handling, you want the battery as close to the seat-post as you can get it. Is there any way to shorten the front pieces? You can make a rack for about £5 with a piece of alloy tube from Wickes and a small piece of plywood/aluminium. Fitting the battery in the triangle is better for handling, but it's always difficult to make them look nice like that.

You can fix the torque arm to the disc mount on the other side. You'll need to drill a hole in the second stainless piece, which is nearly impossible. You need a specially hard drill - ideally those ones that can drill through anything that you see at shows. This is Saneagle's Kraken before we ground the top bit iff with an angle grinder.

Here's my giant - a bit muddy:

 
Last edited by a moderator:

103Alex1

Esteemed Pedelecer
Sep 29, 2012
2,228
67
Battery and bits arrived today so easier to look at options on a number of fronts. Need to get the basic setup design sorted in my head now before going any further. It all has to work on the frame and give me something I like and which meets my day-to-day usage needs and suits my lifestyle and preferences or else I can still sell on the complete kit without fitting it. So it's crunch time, basically !

Done a recap as much for my own benefit as anything else - bike is for use in hilly area. Range may be on the longer side with no prospect of battery recharge and to get to other activities with nowhere to leave stuff and have to carry everything I take around with me. This means carrying spare batteries around or removing the one on the bike is a 'no-no' (20Ah battery selected as a result - to be installed 'on-bike'). Circumstances have changed a little - bike is not intended for work commuting, it is for primarily for getting to and around coastal areas and nearby hills and villages.

May need to substitute having a car available for a few days here and there so flexible enough to carry groceries, strap packages to when needed but mainly to be able to go places on and off-road, secure and go off freediving, hiking etc. with a fair amount of kit and not have to bother carrying batteries or other bits which have to stay dry about etc.

Costing rationale - about £500-£600 on parts. Donor bike is desirable on resale even after another year so should hold its full value if it can be reinstated. Bike and frame not to be drilled, damaged or modified such that cannot be reinstated to non-eBike and sold on to recover underlying value. Being rational, the eBike conversion should not be a "1-way ticket".

Tools setup and extras - about 20% of final total project value incl. bike value. Maybe more maybe less.

Kit - capable of disconnection and removal, reinstatement of original bike within about a day if needed - after learning basic relevant skills.

Area of use - relatively mild, very wet, coastal. Weatherproofing controller, parts, connections from latent damp ingress and salt vital.

Final look - as discreet as possible given other priorities, first and foremost that the bike will easily transport my kit about. It was the decisive consideration for my going ahead and building it in the first place.

Expected use / period of use - late February to mid-Autumn 2013. Will review after that and either sell intact, keep intact or remove kit and restore to unpowered MTB to keep or sell on.

Expected depreciation - no more than £300 overall in year 1. Potentially less to none if built bike sold on and not in a rush.

Expected spin-off benefits - no end of learning opportunities. No-brainer.

Going to go look at the bike with some of the bits in hand to actually see whether donor bike will work well enough now and what the likely final look will be. Also what siting battery and controller in different locations actually means in terms of aesthetics. It's extremely difficult to envisage this from written specs especially with no battery dimensions !!
 
Last edited:

Old_Dave

Esteemed Pedelecer
Sep 15, 2012
1,211
2
Dumfries & Galloway
Expected on going expense - something equal to the national debt of a small country, some one (dam them) will always be posting about some must have gadget / device, also I doubt you will be happy 3 days after the bike is complete as you will notice things that are not quite right and need to be done differently, also spare parts need to be at hand, and not have to wait upon deliverys from the east .. :p

Expect plan b - there's should always be a plan b, like a trailer for all your gear :D
 
Last edited:

103Alex1

Esteemed Pedelecer
Sep 29, 2012
2,228
67
Expected on going expense - something equal to the national debt of a small country, some one (dam them) will always be posting about some must have gadget / device, also I doubt you will be happy 3 days after the bike is complete as you will notice things that are not quite right and need to be done differently, also spare parts need to be at hand, and not have to wait upon deliverys from the east .. :p

Expect plan b - there's should always be a plan b, like a trailer for all your gear
Yeah you're right about ongoing expense. Though bar breakdowns the thing I'm interested in other than keeping it functioning this year is basically the Speedict options and possible potentiomenter. No doubt more things will emerge - but if I have something which works well enough and I'm not there all the time chances of my tinkering too much once it's built are pretty slim to be honest. If it lived with me full time I'd be adjusting things constantly to get that extra bit of perfection :)

Viz plan b ... been through that though process before and concluded I'd likely never use it. Too much faffing about, hard to secure, impractical off-road, not great on potholed windy narrow country lanes you can barely drive along with rivers of water flowing on either side 12 months of the year. Need to think off-road rigour rather than town/village to steer the solutions on this one, I reckon.

Can't help wondering whether something like this is the obvious solution (similar to post above) :

Mtbr Forums - View Single Post - How to sew a frame bag. Long and pic heavy.

Would use a long strip of material for the velcro strips rather than several short ones because it looks better if the fabric is a different colour to the frame. Unless I can get one in shiny aluminiumcolour that is ;) .. also to make sure it's reinforced inside so as to hold its shape and not sag and look untidy.

The battery is quite short and fat, but it does just fit in the triangle. It's 160mm x 220mm x 90mm

So 3 1/2" max width. Should be OK to ensure adequate pedalling clearance either side in theory. Only thing is the connectors (for charging ?) coming out of it are quite chunky and cables quite short so I haven't worked out yet how that would work.

Controller siting is the other important consideration. Does this need to be close to the battery or near to the handlebars etc ? Does it make any difference other than wiring length ?

Only place I can see that the controller would fit without limiting the tyre width options would be in the triangle bag. It would have to go in the narrow part near the handlebars to fit the battery in. This would mean it could not be fixed rigid to the frame so my guess is that wires may shake loose.

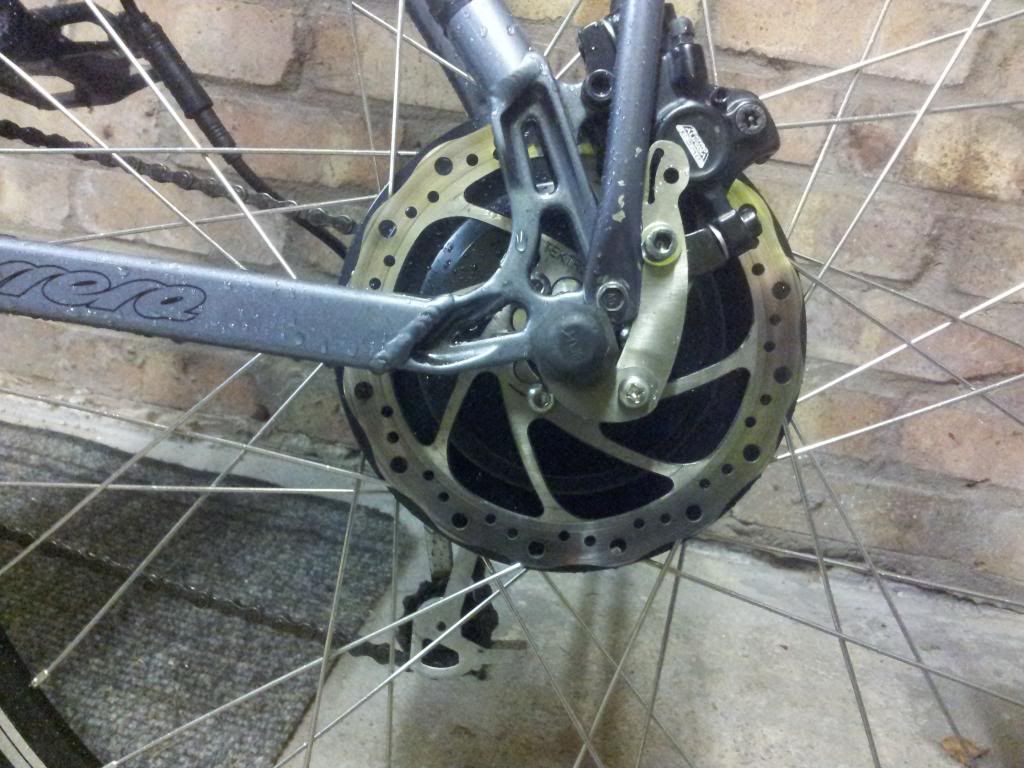
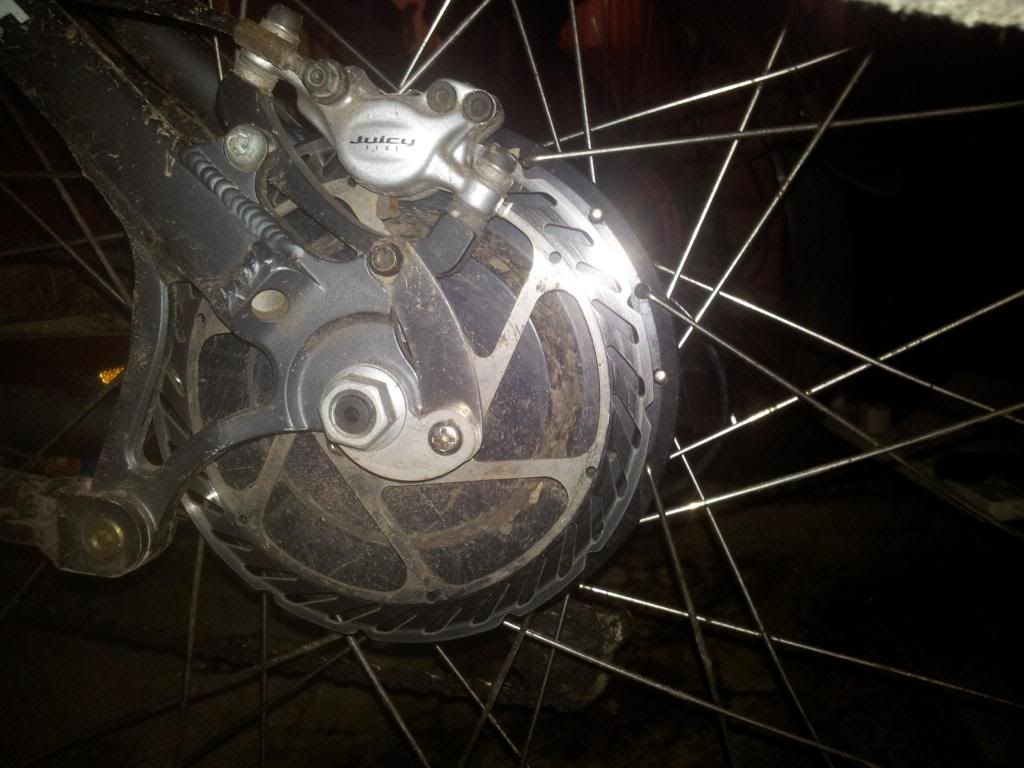
I have also looked at the torque arm setup ... still cannot see where the arm would fix into on either the drive or non-drive side - will need more thought !

Beginning to wonder whether to sell bike and buy cheap hybrid with a frame that is designed to accommodate lots of fixings to hack around with, drill at will etc etc. Thing is if I'd wanted to do that (and lose my gears) would just have bought a kit at less than half the cost ! :confused: ... definitely more thought required before going ahead with any build. I would like the final performance, but if the bike's utility and versatility gets taken over by that then it winds up not fit for intended use.

Must examine all options with this bike first before writing off converting it as "not for me" .. but I need to be able to understand and see clearly what the finished product is going to resemble and think through whether that is something I will want and use before getting underway.

Can still take back most of the specific tools and extras I've bought and get my money back from the retailers. Must keep remembering this .... bit stressed by it all now !
 
D

Deleted member 4366

Guest
When we were trying to decide on the battery position on Saneagle's Kraken, we cut a piece of expanded polystyren to the same size as the battery, and then used it to try the various positions. It was much easier than handling the weight of the battery.

You can put your controller where you want. It makes little difference, but if you're going to make a triangle bag it would go nicely in the top corner. On one of my bikes, I had a zip pocket on the battery bag, so I made a hole on the inside and ran the charger lead into it, so I only had to undo the separate zip to charge, which meant I could keep the main compartment locked with a cable-tie through the zip. It would be much more secur to follow this principle with your frame bag. You should make the main bit with the battery in permanently fixed shut and non removeable if possible. You rarely need to get access the battery once installed, but often need to get to the connectors, which you can run through into an openable compartment.

the battery mustn't be able to bang into the frame, becausethe cells are soft and easily damaged. Consider at least 1cm of polystyrene between it and the frame.
 
Last edited by a moderator:

Jeremy

Esteemed Pedelecer
Oct 25, 2007
1,010
3
Salisbury
When it comes to deciding where to place things it's worth bearing in mind that keeping all the high current wire runs (battery wires and motor phase wires) as short as you can is always a good thing. The motor phase wires carry a fair bit more current than the battery wires most of the time, so keeping these short is a good idea.

Wiring power losses can add up on a bike with long runs and lose a significant amount of power. On my last build (the Swift) I ended up fitted the controller around 18" from the hub motor axle and the battery about 18" or so from the controller, which is about as good as I could get. This made a noticeable difference over the original set up with the battery at the front of the bike; it reduced the voltage drop on the battery wires by a bit over 1/2V.
 

103Alex1

Esteemed Pedelecer
Sep 29, 2012
2,228
67
OK - off to try some combos and see what works. Some nice polystyrene packaging came with the battery looks like it might be just the job for a mock-up.

Wiring power losses can add up on a bike with long runs and lose a significant amount of power.
This is a rear hub motor. So are you saying fitting controller in front of triangle near handlebars translates to long wires and noticeable inefficiency as a result ?
 

Jeremy

Esteemed Pedelecer
Oct 25, 2007
1,010
3
Salisbury
OK - off to try some combos and see what works. Some nice polystyrene packaging came with the battery looks like it might be just the job for a mock-up.


This is a rear hub motor. So are you saying fitting controller in front of triangle near handlebars translates to long wires and noticeable inefficiency as a result ?
Basically, yes, but it depends on how critical about this you want to be. Let's say you use 14g wire and have phase wires runs from the controller to the motor that are around 2m long. If you have a controller current limit of, say, 20A, then the phase wire current is going to be around 40 to 60A when the controller is limiting and the bike is under heavy load, say accelerating or going up a steep hill. Each of those phase wires is then going to be losing you between around 27 watts and 60 watts under that condition.

Of course, much of the time the phase wire current will be a lot lower, but nevertheless the shorter you can keep the motor phase wires the better, as a general rule.
 
D

Deleted member 4366

Guest
The motorr to controller wires are already prepared for you. It's quite a bit of messing about to shorten or legthen them, so you can see where they reach tokleeping in mind that they have to be ties to the frame for neatness, whuch means that they never reach as far as you think; however, they reached the tip front of the triangle on my Rocky Mountain that has quite a large frame.
 

103Alex1

Esteemed Pedelecer
Sep 29, 2012
2,228
67
Great - OK with that lot in mind, a few options :

I turned idea of rack being too far back on its head and squeezed it back a bit more to the limit of what the extension rods would accept. This created 2 bolt fixing slots which just happened to line up with those on the controller housing, placing the controller in a very central position behind the seatpost :

20130118_175128[1].jpg


My initial excitement was tempered somewhat when I realized there were an awful lot of wires coming out of the controller and these would have to slide underneath my hyrdaulic brake cabling to be accessible- and then would result in an untidy mangle of connectors all needing to be housed for waterproofing in an awkward place :

20130118_175302[1].jpg

The battery wasn't so hard to work with for basic size testing - under 5kg - so balanced it in the triangle resting on the screws in the holes for drinks bottles on the diagonal and vertical bars of the triangle to check protrustion laterally :

20130118_175628[1].jpg

The controller can actually fit below the battery rather than in the handlebar end of the frame triangle so perhaps this combo is the best option ? Everything would then be encloseable in a full-triangle bag, which could be modified with compartments in principle. There is certainly space. Would likely need packing material under the battery though, so not sure whether that affects viability of siting controller in the bottom corner like this ...


20130118_183157[1].jpg

Thoughts ?
 

Jeremy

Esteemed Pedelecer
Oct 25, 2007
1,010
3
Salisbury
Certainly best to keep the motor wire runs short, but as d8veh points out, if you're not worried about efficiency and minimising power losses, and want to just leave the wire lengths as they come without remaking the connectors (and bearing in mind that the phase wires that come with the Bafang cables are actually 16g, so woefully thin for anything over 10A or so) then just see where they'll reach.

My personal thoughts are that the wires and connectors supplied with these kits are complete garbage and are best replaced, but plenty of people have used them as-is and had acceptable performance. I have no problem with fitting new, decent wires and connectors though I accept that some may look on doing that as being a bit more work than they want to undertake.
 

jackhandy

Esteemed Pedelecer
May 20, 2012
1,820
323
the Cornish Alps
Siting the controller ahead of the rack, as in the photo, it would get an awful. lot of crud thrown at it by the back tyre.
 

103Alex1

Esteemed Pedelecer
Sep 29, 2012
2,228
67
I'm actually coming round to thinking the controller is best behind the seatpost. Siting it low in the triangle like in the last photo means it is very close to the front chainwheel. The clearance would be very small for a bag which sits in there accommodating the width of the controller. Don't know whether that is an issue but does make me a but concerned.

Certainly best to keep the motor wire runs short, but as d8veh points out, if you're not worried about efficiency and minimising power losses, and want to just leave the wire lengths as they come without remaking the connectors (and bearing in mind that the phase wires that come with the Bafang cables are actually 16g, so woefully thin for anything over 10A or so) then just see where they'll reach.

My personal thoughts are that the wires and connectors supplied with these kits are complete garbage and are best replaced, but plenty of people have used them as-is and had acceptable performance. I have no problem with fitting new, decent wires and connectors though I accept that some may look on doing that as being a bit more work than they want to undertake.
Work I do not mind - it is whether I am experienced enough. I'm afraid I have no experience at all of wiring other than changing a plug and whilst I am game and willing to learn all that is needed and give it a go, everything is from 1st principles for me.

I do, however, have experience of working with applications needing robust waterproofing, laying armoured cabling and other outdoor applications. My first instinct when looking at the connectors is to conclude that they are unsuitable for wet and damp outdoor applications. I want to build something that will work and will last in challenging conditions - so I can relax and get on with enjoying the built product without worrying whether the damp will get to it or I'll have to have it apart to fix every month. If that involves swapping every lead from ground 0 then so be it - it's time well spent in the long run.

An alternative is to get another controller with longer wires and quality connectors. It might work out just as cheap but I would need one that is of a similar spec to be compatible.

My feeling has always been looking at pictures of these controllers and imagining where they would be operating that the wires are far too short. But without actually putting all the pieces and wires on the bike it's hard to be sure. Certainly it would be helpful to be able to lead them away from the controller into an area where there is more space. For example well into the triangle area within a bag, so they can be enclosed and all wiring neatly concealed.

Siting the controller ahead of the rack, as in the photo, it would get an awful. lot of crud thrown at it by the back tyre.
This is the problem with proper MTBs generally - if you don't have a fixing point on the frame it is very hard to have mudguards unless they are the crud catchers which fix to the seatpost and that flyaway design is not compatible with anything on the back of the bike. These frames are of course not designed to be used with pannier racks or mods like this being only intended to be unloaded from the van where all your stuff is left, ridden the cr*p out of and taken home to wash ! However, they handle really well and are lovely bikes to ride so trying to find some way of making it work.

If a mudguard solution can be designed then the worst of it can be kept off but as I've always felt, the controller, connections and cable exits need to be absolutely watertight for the project to be a goer. Basically, the controller and multitude of wiring connectors will have to go inside a bag - they could not survive even gentle rain as they are and I also have misgivings about the aperture of the aluminium controller housing that the wires exit from. This surely needs to be 100% watertight if the controller is sited anywhere other than inside a completely waterproof bag ?
 
Last edited:
D

Deleted member 4366

Guest
The controller itself isn't waterproof. If you look in the sillicone grommet where the wires come out, there's loads of unused holes. If you want the controller outside, it has to be tipped up so that the wires and holes are at the bottom. I think it's best to mount the controller inside your bag, where it'll be kept dry, and it'll hide all the untidy connections.

It's nice when people come up with original ideas and find new ways to overcome problems. We went through exactly the same as you and we tried our battery and controller in every position on the bike, but in the end we decided that simple was best, so, if all else fails, you have a ready-made solution by copying Saneagle's Kraken that has excellent balance and handling, and it's very neat and stealthy:
http://www.pedelecs.co.uk/forum/electric-bicycles/13226-new-build-carrera-kracken-conversion.html
 

Jeremy

Esteemed Pedelecer
Oct 25, 2007
1,010
3
Salisbury
Generally controllers aren't that well sealed, although they do have rudimentary gaskets on the case ends. They come with fairly short wires for two reasons, firstly it's cheap, secondly they all use wires that are a bit thin, and fairly unsuited to long runs.

If you just want to get it running, then I'd suggest leaving the wires as they come and fitting the controller with something to keep the worst of the crud off. Controllers don't really need to be sealed to the point where they are submersible, just placed where they don't get water and mud thrown directly at them. I saw a cheap and cheerful controller cover made from a cut down plastic milk container, did the job admirably, if not aesthetically pleasing...........

[edited to add: cross posted with d8veh ]
 
Last edited:

103Alex1

Esteemed Pedelecer
Sep 29, 2012
2,228
67
Thanks for the feedback - trying to keep a level head at the moment !

Controller siting is turning out to be the critical factor on this one. It's definitely neater behind the seatpost and would be ventilated there too. Would have to be upside-down(label-side to ground) because with the seatpost angle it will not fit the other way in the space available. However, this would require a further solution to keep wet and mud away and likely a complete re-wire too as although the cabling can be neatly slipped under the brake cables into a bag they are too short on this controller.

So going back to siting the controller in a frame bag, I am figuring I can design a flap for incoming wires to go under and into the frame bag. Am I right in thinking these will come from both the non-cassette side of the the hub and the front of the bike ? Have to confess I haven't even started to think about understanding the wiring layout or what wires where would even be (perhaps it's time I started !).

There are 2 large connectors on the battery. Presumably one is for the charger. Is the other supposed to connect to the controller ?

On spacing the controller and battery, does there need to be clearance between controller and battery for example due to heat ? These are likely to be very close together at one point in there (a few mm only to play with, enough for a thin layer of polystyrene or similar). Is that a problem ?

I've tried the battery and controller in my Topeak bag (biggest they do). I can fit one but not both (unless I hammer back the controller casing to make a rectangle without protruding plates with screw holes on either side and even then it's tight with precious little space for connectors etc).

d8veh, I love the Craken. If I wanted a bike for road and soft trail riding and especially without the involvement of the water stuff I'd be happy with fixing it up on the back for a few months and seeing how it goes. However, no matter how much I will myself to compromise and take the easy route here, I know for certain that I will regret it every time I want to take the bike to the sea in the months ahead when I don't have my rear rack free. When your gut instinct is kicking in so hard every time you revisit an option you just have to listen to it :) ... I am pretty certain that the performance specs are spot on for purpose so bear with me on the siting complications ;) Would rather go all the way and design end-use setup in from the outset than try to change later.. when Winter's over I'll want to be outdoors enjoying it all again :cool:
 

hech

Esteemed Pedelecer
Oct 29, 2011
352
27
argyll
This is interminable, Alex you really ought to join the Womens Rural Institute, do you by any chance know Morphix? You would make great penpals, really. Please stop wittering on and just shove the damn controller and battery in a bag. I have my own views as to where you might shove that but the frame triangle would be the obvious choice to the rest of humanity. There are no more outstanding issues so just go out to the shed and do it, and then come back and tell us how you got on when it has been done.