Oxydrive kits

  • Thread starter Deleted member 4366
  • Start date

patpatbut

Esteemed Pedelecer
Apr 25, 2012
860
79
Nowhere near as much. It has about the same torque as an Ezee bike or one of the Kudos bikes with a BPM motor. Maybe slightly more. You'd have to ride them back to back to be sure.

Yes, it should be possible to get more current by soldering the shunt or adjusting the shunt resistance some other way.From tests I did, this version of the motor can go up to about 22A. It doesn't get any hotter after that. It just doesn't give any more torque for some reason - maybe saturation.

I was talking to Andew today. He told me about a new left-hand pedal sensor that will be shipped with the kits, so you get two, which gives a choice of a conventional RH one, where you have to remove the BB to fit it, or the new LH one, where you only have to remove the left crank. It only works with a cartridge type BB that has the conventional internal spline for the BB tool.Here's a photo. The whole thing is only about 35mm diameter. The spline clips into the BB and the inner diameter is tight on the BB spindle, so goes round with it. No magnet disc is needed. It's very neat and discrete. I'll have to tap him up at the Excel show to see if he can get me some
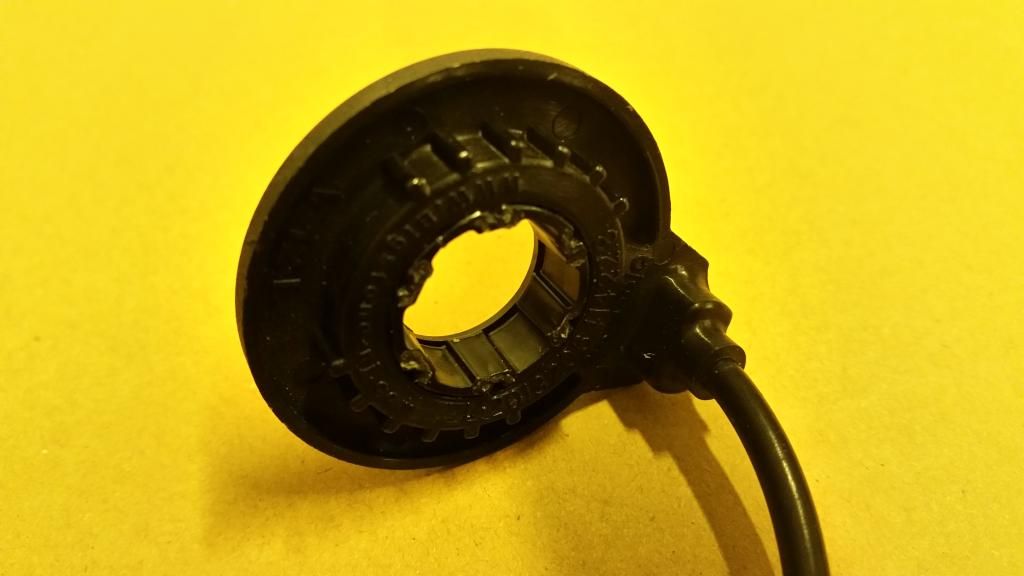
Hi Dave

Can you recommend a good cartridge Type BB that fits this sensor perfectly ?
 
D

Deleted member 4366

Guest
Any one should do. The only BBs that don't fit are non square taper type (Hollowtech, Octalink, etc), and the cheapo non-cartridge BBs. The BBs that Halfords do are OK or these Shimano type ones:

http://www.ebay.co.uk/itm/SHIMANO-TYPE-SEALED-CARTRIDGE-BOTTOM-BRACKET-SEALED-BEARINGS-110mm-to-127-5mm-/261272331430?pt=UK_sportsleisure_cycling_bikeparts_SR&var=&hash=item3cd50b64a6

If you're going to get a new one, it might be worth looking at the gap between your BB and LH crank. If it's less than 5mm, you might want to get a slightly longer BB, bearing in mind that each 2mm longer adds 1mm to each side. If you go too wide, your front derailleur might not reach.
 

Ian_Fearn

Pedelecer
Nov 16, 2007
53
17
I had confirmation my kit had been despatched today complete with the new sensor. I must admit I was initially dubious when the email came through but having read this my fears have been put to rest.
 

baldylox

Pedelecer
May 25, 2012
240
77
Hants/Wilts border
I had confirmation my kit had been despatched today complete with the new sensor. I must admit I was initially dubious when the email came through but having read this my fears have been put to rest.
My kit has likely been despatched today also so it may arrive tomorrow.
I have a hollowtech BB so unfortunately the new pedal sensor won't be used :confused:
 

baldylox

Pedelecer
May 25, 2012
240
77
Hants/Wilts border
My kit has turned up :)
However, problem number 1 to solve is the mounting of the battery. Although I have the required frame clearance (big sigh of relief) the water bottle mounting points are way too low down the frame to accommodate the battery.
I will assume that I can drill a couple of holes in the frame order to accept threaded mounting points such as rivnuts?
Any advice will be gratefully received.
 
Last edited:

jonathan75

Esteemed Pedelecer
Apr 24, 2013
794
213
Hertfordshire
My kit has turned up :)
However, problem number 1 to solve is the mounting of the battery. Although I have the required frame clearance (big sigh of relief) the water bottle mounting points are way too low down the frame to accommodate the battery.
I will assume that I can drill a couple of holes in the frame order to accept threaded mounting points such as rivnuts?
Any advice will be gratefully received.
I thought the same with my bottle battery - it turned out I was mistakenly matching up the mounting-plate/battery bolts with the bike's bottle screws, rather than matching the bike's bottle-screws with the mounting plate slots;the latter slots actually ran nearly the length of the plate so as to permit considerable flexibility in placement on the frame.
 

Nealh

Esteemed Pedelecer
Aug 7, 2014
20,917
8,533
61
West Sx RH
Should be no problem drilling and fitting extra rivnuts, I did it on my Norco frame as extra fixings for my 15ah Woosh 09 battery so it now has four.
Don't oversize the holes for the rivs though.
 
Last edited:
  • Like
Reactions: baldylox
D

Deleted member 4366

Guest
I used an extra rivnut on my Rocky Mountain to give three mounting points for the battery to give it more strength for the battery mount.

If you decide to fit rivnuts, try and choose ones with a big flange for more strength. Some have almost no flange. Rivnuts are easy to fit. You don't need the special tool. Just make sure that you press the flange against the frame as you do up the bolt. Some people use a strip of steel with a hole in it to hold it down, but I don't think you need that as long as you're careful.
 

Nealh

Esteemed Pedelecer
Aug 7, 2014
20,917
8,533
61
West Sx RH

Nealh

Esteemed Pedelecer
Aug 7, 2014
20,917
8,533
61
West Sx RH
Mine arrived this morning have just opened the box.
All looks very nice plug and play and all that.
Superbly designed Tektro cut off brake lever with very good sounding intergrated ping bell , o ring magnet for reed sw is nicely intergarted with the lever pivot/pin shame I can't make use of it as I have f & r Hydraulics. On second thoughts will think about converting rear hyd disc to cable disc it seems a shame not to use the nice designed lever supplied.
 

Ian_Fearn

Pedelecer
Nov 16, 2007
53
17
Have just opened my kit up. That new style pedal sensor is a bigstone v12l if your interested.

check out bigstone-nj.com
 

baldylox

Pedelecer
May 25, 2012
240
77
Hants/Wilts border
I am considering dismantling the tektro brake lever cut off to see if I can re-use whatever I find inside (hydraulic brakes also), I assume a reed switch. That way I hope to avoid the issue of cutting the plug off and soldering to a new reed switch.
Again, any advice greatly appreciated.
I also like the ping of the bell, nicely integrated... I'd always wondered what it was on the brake lever in the pictures.
 
D

Deleted member 4366

Guest
You can measure the battery voltage on the connector underneath. It's the two outer holes. They'll all be already charged to 41.4v unless somebody accidentally pressed the on switch some time before shipping.

The charger will stay green when you try to charge a full battery, but if you press the battery's power button while the charger is connected, it'll go red if you want to test that the charger's working.

The 4 LEDs next to the power button on the side of the battery will show green when fully charged. They go out one by one as it discharges.

Who's going to be first to get theirs on the road?
 

Nealh

Esteemed Pedelecer
Aug 7, 2014
20,917
8,533
61
West Sx RH
If dismantling to use the reed sw, you will have to cut and re-solder as there is a metal threaded adjsuter screw that can't be removed which in turn is pinched to the brake lever assembly underneath by a alllen grub screw. Whether I use the brake lever/sensor as it is or use it dismantled I would be inclined to lengthen it a little as it is short and means the display can only really be fitted to the far left.

I'm not in rush to be on the road as I also have my BBS, need to get new spokes so I can rebuild and use exsisting rim so f & r match also need to get mech disc caliper for rear.

As Selrahc has already mentioned it will be interesting to see inside the battery controller to see what the shunt looks like and so that the amps can be upped a little to give a bit more torque later if needed.
 
Last edited:

baldylox

Pedelecer
May 25, 2012
240
77
Hants/Wilts border
I'd be on the road tomorrow but for the fact that I'm waiting for delivery of rivnuts and a flexible drill bit to get at the frame.
There's no rush :rolleyes:
 

baldylox

Pedelecer
May 25, 2012
240
77
Hants/Wilts border
If dismantling to use the reed sw, you will have to cut and re-solder as there is a metal threaded adjsuter screw that can't be removed which in turn is pinched to the brake lever assembly underneath by a alllen grub screw. Whether I use the brake lever/sensor as it is or use it dismantled I would be inclined to lengthen it a little as it is short and means the display can only really be fitted to the far left.

I'm not in rush to be on the road as I also have my BBS, need to get new spokes so I can rebuild and use exsisting rim so f & r match also need to get mech disc caliper for rear.

As Selrahc has already mentioned it will be interesting to see inside the battery controller to see what the shunt looks like and so that the amps can be upped a little to give a bit more torque later if needed.
I have wide bars on the trance so the wire lengths as supplied are (ahem) challenging... However I have been able to fit the throttle on the right (tricky as if too close to gear triggers it'll foul 'em), disassemble the reed switch from the tectro brake lever and rig it up to the left brake lever (ready for a magnet to be fixed to the brake lever). The adjuster screw actually helps placement.
Hopefully this will work out in the final solution without the need for any cutting and soldering keeping everything neat & tidy.