Trouble fitting disc brakes to XF08c kit from Woosh

tpw

Finding my (electric) wheels
Oct 14, 2018
23
1
36
As per title, I received the XF08c kit today, but I can't get my caliper/carrier combination to fit

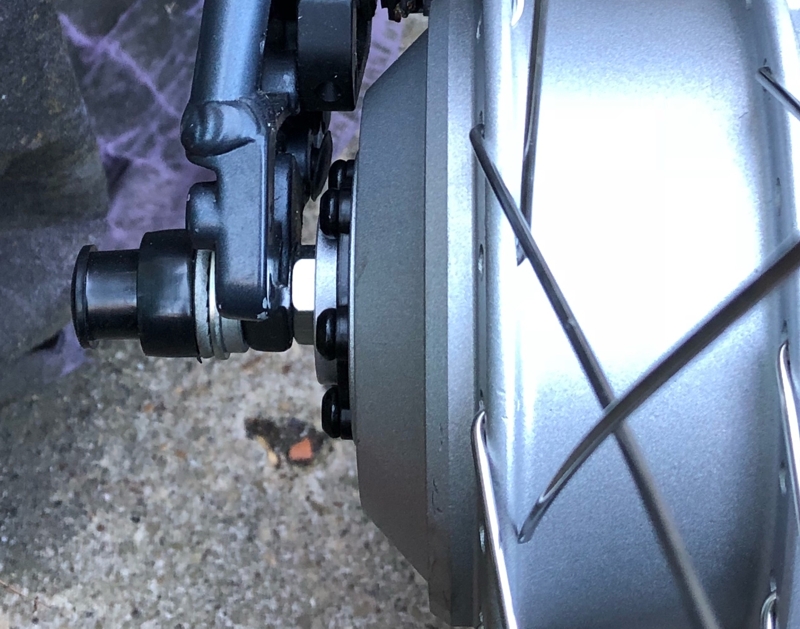
With the standard mounting (caliper on the inside of the dropout) the carrier fouls the motor, but even if it didn't it would put the caliper way past the brake disc
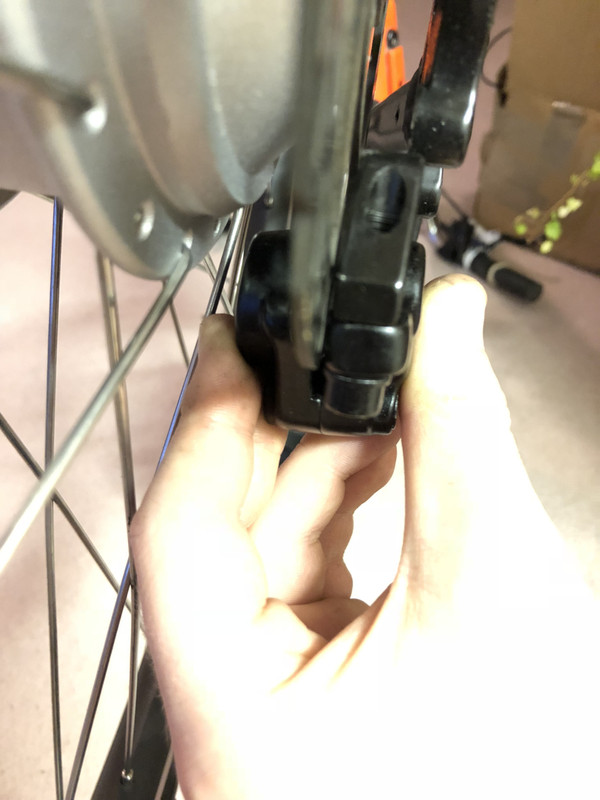


I thought of mounting the carrier on the outside of the dropouts, but this leaves the caliper sitting right underneath the frame so that's not going to work either
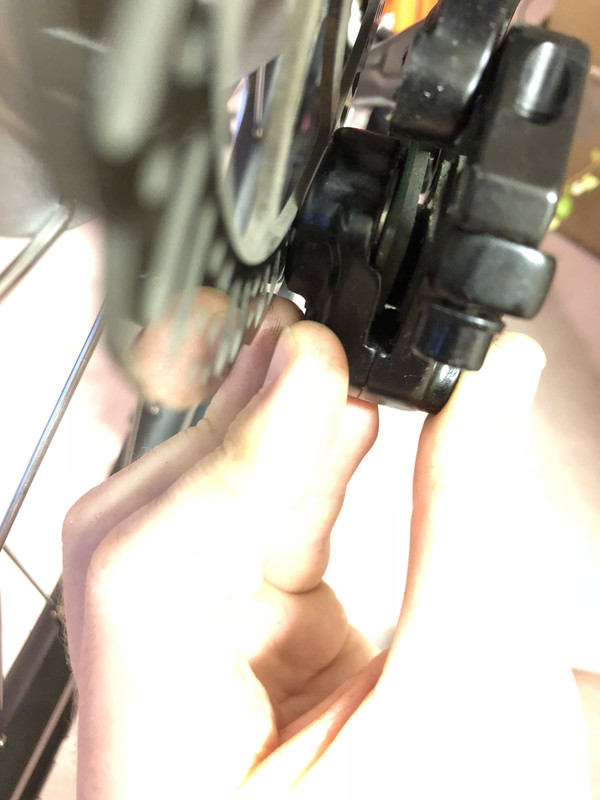


It was already a tight fit between the dropouts so I don't think I can put spacers on the inside to make a bit more room either, at least not without stretching the frame which I imagine would damage it?

So am I missing something, or is there something that can be done?
 

D C

Esteemed Pedelecer
Apr 25, 2013
1,142
577
I had a similar problem with my Hayes caliper, solved by replacing the 160mm disc with a 203mm disc using a caliper adapter.
Dave.
 

tpw

Finding my (electric) wheels
Oct 14, 2018
23
1
36
Was that in conjunction with mounting the carrier on the outside of the frame?

Because otherwise I can’t quite imagine how that could solve the problem of the carrier not fitting between the disc and the frame...
 

awol

Esteemed Pedelecer
Sep 4, 2013
1,216
374
It was already a tight fit between the dropouts so I don't think I can put spacers on the inside to make a bit more room either, at least not without stretching the frame which I imagine would damage it?

So am I missing something, or is there something that can be done?
The frame will pull apart quite a bit.
I would leave the caliper mounted as it was originally with the caliper central and add the odd washer or 2 to the axle on the brake side and remove any from the other side. I think some people even put the thicker anti-rotation tabbed washer on there with the tab pointing outward.
 

super josh

Finding my (electric) wheels
Oct 2, 2018
16
3
59
Most hub motors need a minimum of a 180 mm disc to stop the caliper from fouling on the motor. For the disc/caliper alignment fit some spacers as mentioned above.


Josh
 

tpw

Finding my (electric) wheels
Oct 14, 2018
23
1
36
Yeh it's definitely an alignment issue, which I think is why I was confused about the caliper adaptor suggestions.

I've tried it with a spacer and it works (stretching the frame slightly), but that was also with one of the cogs from the cassette removed.

It's an aluminium frame (7005 alloy) rather than steel, and everything I've read suggests you really shouldn't stretch aluminium.. but we are only talking 1-2mm so I'm guessing it will be ok?

So my plan is to find the thinnest washer that will stop the disc rubbing on the carrier, and also to file the dropout on the cassette side so that it will fit with all the cogs

Thank you for all the replies, and if any of that sounds stupid/dangerous please let me know!
 
Last edited:

Woosh

Trade Member
May 19, 2012
20,451
16,916
Southend on Sea
wooshbikes.co.uk
You need to re-arrange the washers to line up the rotor. Can you post a picture similar to this one?


Usually, if you have disc brakes, the steps are:

1. turn the bike upside down, it's easier that way.
2. loosen slightly the M5 bolts on the caliper so to help with aligning the
rotor.
3. note the positions of the washers on the motor axle, remove all the
washers and wheel nuts.
4. VERY IMPORTANT: put a normal thin washer on the motor's spindle,
derailleur side to protect the cassette.
Now you are ready to drop the wheel in.
a. Drop the wheel in while trying to align the rotor between the brake
pads. Move the caliper only if necessary.
b. Check the gap on the rotor side between the nut on the wheel and the
frame. Is there enough space for the anti torque washer? If it is possible,
you want the anti-torque washer to be inside the frame. The anti torque
washer is the one with a thick lip, the lip goes into the opening of the
drop out. You want the motor exiting to the same side as the torque washer's
lip, ie, the opening of the dropout.
If there isn't enough space inside the frame, you need to pad out the space
inside the frame with normal washers, the torque washer will have to go
outside.
c. Check the space also on the derailleur side between the motor and the
frame, if there is enough space for the torque washer to be inside the
frame, you want it inside. If not, you need to pad out the space inside the
frame with normal washers, the torque washer will have to go outside.
 

tpw

Finding my (electric) wheels
Oct 14, 2018
23
1
36
Thank you for this information, but can I ask why I haven't been given any of it before now, despite buying a kit? It's not in the manual on your website either.. Unless I'm missing something?

I'm particularly worried about how you've said that #4 is very important, yet this is the first I've heard of it; is there anything else of similar importance that I should know?

It wasn't so much that the rotor wasn't lining up with the caliper, more than it was fouling the carrier.

One last thing - do I need to have the black plastic spacer between the rotor and the motor? If so I really don't think it's going to fit..
 

Woosh

Trade Member
May 19, 2012
20,451
16,916
Southend on Sea
wooshbikes.co.uk
One last thing - do I need to have the black plastic spacer between the rotor and the motor? If so I really don't think it's going to fit..
If I understand correctly, you have bolted the rotor on top of the black plastic blanking plate - that's caused the problem.
yes, you have to remove the plastic banking plate. It's there to stop the bolts hitting the innards of the motor. Remove it before installing the rotor.

I'm particularly worried about how you've said that #4 is very important, yet this is the first I've heard of it; is there anything else of similar importance that I should know?
They are precautions to stop accidental damage when you install the wheel. On the derailleur side, you need to keep a gap between the smallest chainring and the frame, wide enough to let the chain through in case it gets off the cogs.


Thank you for this information, but can I ask why I haven't been given any of it before now, despite buying a kit? It's not in the manual on your website either.. Unless I'm missing something?
there are differences between donor bikes, we can assist you if you need it whenever you need it by emailing support@wooshbikes.co.uk

The kit installation manual is downloadable from the web page:
http://wooshbikes.co.uk/manuals/Hub Kit Manual KM529 June 2018.pdf

I will of course ask Andy to add a note for the wheel in the manual.
 
Last edited:

R0881E

Pedelecer
Sep 11, 2017
60
4
UK
Jumping into this thread sorry.
I am trying to install my q128c on a specialized diverge that I bought used.
I have hit numerous issues but am now stuck on fitting the rear wheel.
I have attached a 160mm disc to the motor but cannot fit it into the wheel because the brake caliper is hitting the motor.
If I adjusted the washers then it will surely still hit the caliper. I cannot move the caliper laterally because the rotor is attached to the motor so that gap cannot change??
I have looked at moving up to a 180mm rotor as per other threads on here but even though my disc is 160mm, the current mounting kit says 180mm. Is this because a 180mm front converts to 160mm rear? Can anybody advise what I need to pick up to sort this out please? I have spent so many hours trying to put this back together since I sold my old bike in Sydney and moved back to the UK.

IMG20181028125259.jpg
IMG20181028132446.jpg
IMG20181028183011.jpg
IMG20181028143554.jpg

Thanks.
 

Nealh

Esteemed Pedelecer
Aug 7, 2014
20,981
8,565
61
West Sx RH
Is this because a 180mm front converts to 160mm rear? Can anybody advise what I need to pick up to sort this out please? I have spent so many hours trying to put this back together since I sold my old bike in Sydney and moved back to the UK.

Thanks.
Yes.

For rear you will need a specific 180mm rear adapter post to post.
https://www.ebay.co.uk/itm/Ultralight-Disc-Brake-Adapter-Rear-180mm-POST-PM-Frame-to-POST-PM-Caliper-BLACK/221808389632?hash=item33a4cf6e00:g:PsgAAOSwFHZaqTqQ:rk:28:pf:0
 

Woosh

Trade Member
May 19, 2012
20,451
16,916
Southend on Sea
wooshbikes.co.uk
Motor Wheel

Fit the rim tape to the motor wheel, and then swap the tyre, tube and freewheel/cassette (in the case of a rear wheel) from your original wheel over to the motor wheel.
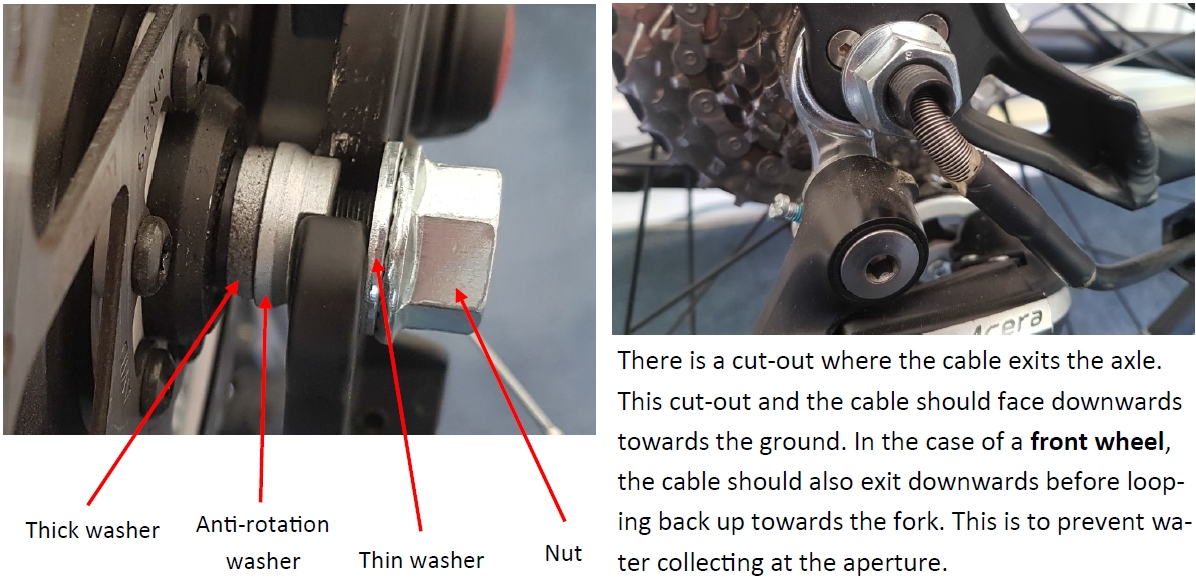
The wheel comes with the nuts and washers that you will need, they should be fitted in the order shown below.
Sometimes it is necessary to re-arrange them, or to fit additional washers to ensure the wheel is correctly aligned. The anti-rotation washer for instance, can be flipped around and fitted on outside of the fork if needed.
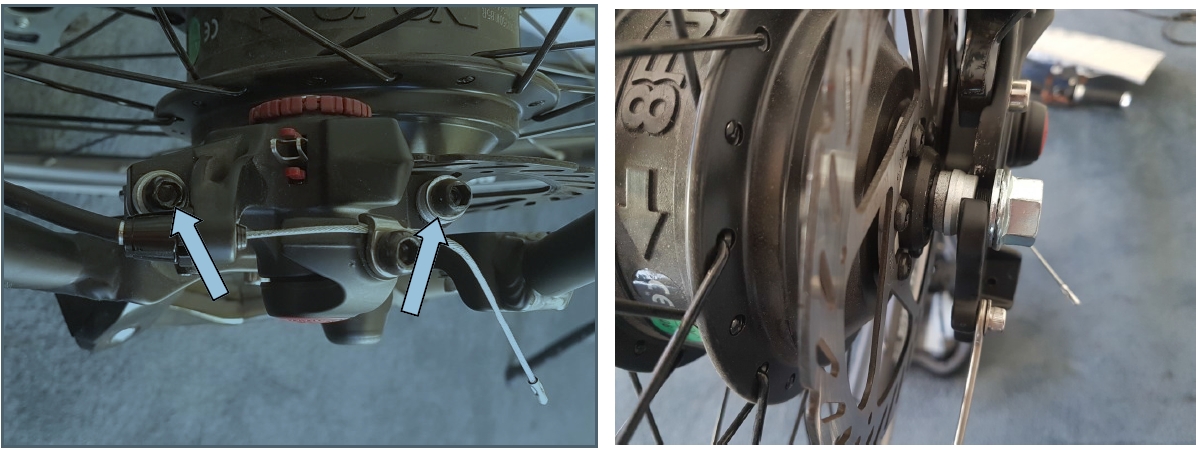
If you have disc brakes, loosen the two bolts indicated below-left before fitting the wheel to the bike. This will allow you to make any minor adjustments immediately. If you are experienced, you can remove the calipers, but if you’re not experienced, you will likely face less issues leaving them in place, and then adjusting the order of the washers etc. to get the correct alignment. Don’t forget to tighten the caliper bolts after the wheel is correctly fitted and the rotor correctly aligned.


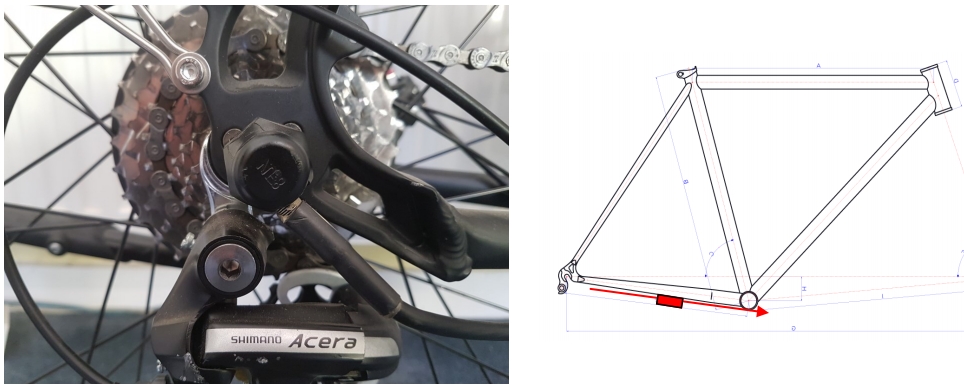
The normal order for the nuts/washers is as below, but as mentioned above, it may be necessary to rearrange them to suit your particular bike. On the drive-side, try to leave enough space so that if the chain were to come off, it won’t get jammed between the frame and cassette/freewheel. Ensure that the motor cable exits downwards towards the ground as much as possible.


There is a cut-out where the cable exits the axle. This cut-out and the cable should face downwards towards the ground. In the case of a front wheel, the cable should also exit downwards before looping back up towards the fork. This is to prevent water collecting at the aperture.


To complete the installation of the wheel, fit the nut covers. The left side cover simply pushes on, the drive side cover should be slid down the cable and fitted. The red arrow on the diagram above-right shows the typical route for the motor cable, with the quick release connector (in the cable) indicated by the solid red box. Remember to properly secure these cables with cable-ties before riding the bike.