Help! Issues with first time conversion(bad idea)

Craig88

Finding my (electric) wheels
Aug 16, 2018
8
1
36
Hi all, finally ordered a kit, from Woosh, but I'm now realising I should have got it done by them. It seems I need to add another rivet hole or two as the current set up is too low. What is the easiest/cheapest way to get this done?

Also I'm not sure how to fit my existing disk brake on the new hub as it doesn't seem to have the 6 bolts that my previous one had installed in the cassette.

Thanks
 

Woosh

Trade Member
May 19, 2012
20,387
16,882
Southend on Sea
wooshbikes.co.uk
you need a punch, 3mm drill bit if you have one, 6.5mm or 7mm HSS drill bit.
Put a bit of masking tape on the downtube, mark the hole with a biro,
Tap the hole with a punch.
If you have a 3mm carbide drill bit, use it to drill a pilot hole. If not, set your drill to the slowest speed and drill with the 6.5mm HSS bit. Don't worry that your drill bit is at a slight angle. You will need to finish it to 7mm before you can fit the supplied M5 aluminium rivnuts.
You can finish the 7mm hole with a round file or with the shank of a 6mm allen key.
Push the rivnut in. Then either use a rivnut gun or M5 bolt with two nuts to expand the rivnuts.
If you bring your bike in, I'll fit the rivnut with you.
rivnut insert tool:
https://www.ebay.co.uk/itm/86Pcs-Threaded-Nut-Rivet-Gun-M3-M8-Insert-Tool-Riveter-Rivnut-Nutsert-Riveting/312594235278


From the woosh web page:
http://wooshbikes.co.uk/?hubkits
We recommend that you send us pictures of your bike to kits at woosbikes.co.uk - we'll check for you.
If the location of your cage bolts do not fit the slots on the mounting rail, you may need to install one or two rivnuts (usually M5 rivnuts) on the downtube. You don't need any special tool but if you have never done this before, Read this article.
Or watch this video:
 

Woosh

Trade Member
May 19, 2012
20,387
16,882
Southend on Sea
wooshbikes.co.uk
Also I'm not sure how to fit my existing disk brake on the new hub as it doesn't seem to have the 6 bolts that my previous one had installed in the cassette.

Thanks
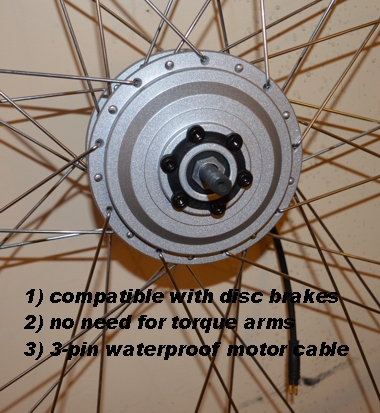
Look on the rotor side of the motor wheel: you see 6 bolts and a spacer.
Remove the 6 bolts, then replace the spacer with your rotor.
This is the rotor side of the XF07. the XF08C is similar. Your rotor goes where the black spacer is.


If you have any difficulty, you can email support@wooshbikes.co.uk, best with pictures of your progress, we do reply even at weekends.
 
  • Like
Reactions: Audio2

D C

Esteemed Pedelecer
Apr 25, 2013
1,142
577
It might be worth mentioning that it's best to use the new bolts that came with the kit as the originals from your existing hub may be too long and could foul the insides of the motor.
A picture of your existing rotor would help folk to advise you, it doesn't sound like a standard one from your description.
Dave.
 
  • Like
Reactions: Craig88

Steve Dyson

Pedelecer
Oct 13, 2018
72
13
Hi all, finally ordered a kit, from Woosh, but I'm now realising I should have got it done by them. It seems I need to add another rivet hole or two as the current set up is too low. What is the easiest/cheapest way to get this done?

Also I'm not sure how to fit my existing disk brake on the new hub as it doesn't seem to have the 6 bolts that my previous one had installed in the cassette.

Thanks
Mate, dont be disheartened, it took me 4 weeks to work out what i was doing when i got mine last september and still tweaking it bit by bit, can you post pics of the hub motor both sides and will try and advise best i can
 
  • Like
Reactions: Craig88

Craig88

Finding my (electric) wheels
Aug 16, 2018
8
1
36
Thanks for that Woosh. I actually ended up seeing that video before you recommended it but was a bit put off on drilling a hole into the bike and getting a rivot tool as well.

Could I get away with just using one existing rivet and then cable tying it as well?

I seem to get sparks occasionally when the screwdriver ends up touch the connector part on the controller. Is this normal?

I now see the disk brake solution from that image, so I would remove those bolts and also the plastic spacer thing?

I have ordered the chain and cassette tool so might give it another go tomorrow if I'm feeling confident/foolish...

I ended up then having to watch a video to see how to put the original wheel back on as the rear derailleur was confusing me :/.

Thanks
 

Woosh

Trade Member
May 19, 2012
20,387
16,882
Southend on Sea
wooshbikes.co.uk
Could I get away with just using one existing rivet and then cable tying it as well?
It's OK to ride the bike for a short while that way but it's not safe to have just 2 bolts holding the 3.2kg battery. The main issue is that the battery base is made from plastic, it can break off if not secured with 3 points and land your battery on the ground if you hit a pothole or example. beside the weight, thieves can also prise the battery lock pin if you deform enough the base plate.
I seem to get sparks occasionally when the screwdriver ends up touch the connector part on the controller.
iinside the controller, you have a large capacitor (2.2mF) that gets charged every time you install the battery onto its base (cradle). It will take about 15 seconds to discharge. If you touch the two middle pins with your screwdriver before the 15 seconds, then you will see a spark as the large capacitor discharges through your screwdriver. That's normal and pretty harmless.
Everyone doing a conversion for the first time will have to go through some 'baptism of fire' ritual but there is a genuine satisfaction in problem solving!
 
  • Like
Reactions: Craig88

Benjahmin

Esteemed Pedelecer
Nov 10, 2014
2,593
1,749
70
West Wales
It's true, it's well worth it. You end up with a bike that you understand and know how to fix should it be needed.
Take your time, stick at it. You'll get there.
 
  • Like
Reactions: Craig88

Craig88

Finding my (electric) wheels
Aug 16, 2018
8
1
36
I've given the project a bit of a break now after the initial hurdle. Tried again this afternoon and hit another issue which was that the lockring tool isn't able to get deep enough to tighten the head. It gets to the part where the axle and cable jut out and it's too thin to get deeper. Is it possible to move the axle further to the other side or should I just go to a bike shop and have them use a different lockring?
 

minexplorer

Esteemed Pedelecer
Aug 22, 2017
532
93
56
Four Lanes,Cornwall
I've given the project a bit of a break now after the initial hurdle. Tried again this afternoon and hit another issue which was that the lockring tool isn't able to get deep enough to tighten the head. It gets to the part where the axle and cable jut out and it's too thin to get deeper. Is it possible to move the axle further to the other side or should I just go to a bike shop and have them use a different lockring?
i had to grind a bit off my lockring tool,maybe all you need to do also