
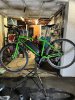
Finally finished!
- Thread starter Russ34
- Start date
Well done! That looks like quite a substantial battery and it may be worth adding some additional straps to help secure it to the frame. I use some wide Velcro type fasteners on my solo bike following advice from here:
 www.hookandloopfasteners.co.uk
It does make the battery a lot more stable.
50mm x 600mm Alfatex® Hook & Loop Front Ring Strap
50mm x 600mm Alfatex® by Velcro Companies hook and loop frontring strap with plastic buckle, 525mm loop straps with 75mm return hook tip, supplied per strap in black.
It does make the battery a lot more stable.
Upside down battery can lead to a couple of issues :I’ve finally finished, thanks for everyone’s advice View attachment 45841
1. Only the lock is holding it against sliding off the mounting hooks, maybe ok on smooth roads, but could be a weakness on bumpy stuff.
2. If used in wet weather or big puddles, any water that gets to the battery pins could drain into the battery rather than away from it.
But looks good!
Ok thanks for the info , they are a couple of good points the guy at the place that sold me the kit said it wouldn’t be a problem but I’ll have a look at the feasibility of turning it roundUpside down battery can lead to a couple of issues :
1. Only the lock is holding it against sliding off the mounting hooks, maybe ok on smooth roads, but could be a weakness on bumpy stuff.
2. If used in wet weather or big puddles, any water that gets to the battery pins could drain into the battery rather than away from it.
But looks good!
Defo try and fit the battery the correct way up as if it does drop out, it's not going to do it much good if it falls out.
You'll have a lot of fun with your new conversion, but a heavy lithium ion battery bouncing along the road could do a lot of bad. The lock and switch are well placed for mud, water and dirt ingress, close to the ground with the battery upside down like that. On my bbs01b conversion, I avoided putting zipties directly on cables because they could over time wear through cable sheathing, or pinching could break internal wires - wherever possible, I use webbing instead to spread pressure applied by zipties:
AMAZON LINK
I've recently discovered the wiring loom cable which plugs into the controller isn't very well connected at the connector - I could see the coloured wires within, as the sheathing parted by a few mm. It was only a matter of time before a wire broke. I fixed the cable in place using 4:1 self adhesive heat shrink shrunk over both the connector and the cable, which is what I should have done in the first place, but I had no idea it was such a shoddy connection then. I'd take a photo of that connector to show you what I mean, but it's now all within the webbing I mentioned secured by zipties. A red arrow points at where the cable sheathing came away on my wiring loom connector (after a year). Mind you, mine was a third party loom purchased on ebay, because the green display connector broke off while it was connected to the programming cable, and I struggled to get it off. Not as well made as the original kit loom (which might actually use glue, or better glue), therefore your mileage may vary. I've applied a tiny smidge of silicone lubricant around the collar of the programming cable since then, because it's such a tight fit. But it's also brilliant that third party spares are so inexpensively available for Bafang BBSXX kits:

Useful, this self-adhesive 4:1 marine heat shrink is! (There's no Yoda icon)

AMAZON LINK
I've recently discovered the wiring loom cable which plugs into the controller isn't very well connected at the connector - I could see the coloured wires within, as the sheathing parted by a few mm. It was only a matter of time before a wire broke. I fixed the cable in place using 4:1 self adhesive heat shrink shrunk over both the connector and the cable, which is what I should have done in the first place, but I had no idea it was such a shoddy connection then. I'd take a photo of that connector to show you what I mean, but it's now all within the webbing I mentioned secured by zipties. A red arrow points at where the cable sheathing came away on my wiring loom connector (after a year). Mind you, mine was a third party loom purchased on ebay, because the green display connector broke off while it was connected to the programming cable, and I struggled to get it off. Not as well made as the original kit loom (which might actually use glue, or better glue), therefore your mileage may vary. I've applied a tiny smidge of silicone lubricant around the collar of the programming cable since then, because it's such a tight fit. But it's also brilliant that third party spares are so inexpensively available for Bafang BBSXX kits:
Useful, this self-adhesive 4:1 marine heat shrink is! (There's no Yoda icon)
Last edited:
Thanks very much for going to so much trouble , I’ll look into this !You'll have a lot of fun with your new conversion, but a heavy lithium ion battery bouncing along the road could do a lot of bad. The lock and switch are well placed for mud, water and dirt ingress, close to the ground with the battery upside down like that. On my bbs01b conversion, I avoided putting zipties directly on cables because they could over time wear through cable sheathing, or pinching could break internal wires - wherever possible, I use webbing instead to spread pressure applied by zipties:
AMAZON LINK
I've recently discovered the wiring loom cable which plugs into the controller isn't very well connected at the connector - I could see the coloured wires within, as the sheathing parted by a few mm. It was only a matter of time before a wire broke. I fixed the cable in place using 4:1 self adhesive heat shrink shrunk over both the connector and the cable, which is what I should have done in the first place, but I had no idea it was such a shoddy connection then. I'd take a photo of that connector to show you what I mean, but it's now all within the webbing I mentioned secured by zipties. A red arrow points at where the cable sheathing came away on my wiring loom connector (after a year). Mind you, mine was a third party loom purchased on ebay, because the green display connector broke off while it was connected to the programming cable, and I struggled to get it off. Not as well made as the original kit loom (which might actually use glue, or better glue), therefore your mileage may vary. I've applied a tiny smidge of silicone lubricant around the collar of the programming cable since then, because it's such a tight fit. But it's also brilliant that third party spares are so inexpensively available for Bafang BBSXX kits:
View attachment 45889
Useful, this self-adhesive 4:1 marine heat shrink is! (There's no Yoda icon)
View attachment 45891
View attachment 45890
Does anyone have any suggestions about a bracket to enable me to turn the battery around please ?
I've never tried these, but I've seen this sort of thing mentioned somewhere on this forum which might be of use. Others may have better ideas and product links:Does anyone have any suggestions about a bracket to enable me to turn the battery around please ?
Pardon our interruption...
www.ebay.co.uk
Thanks very much I’ll take a lookI've never tried these, but I've seen this sort of thing mentioned somewhere on this forum which might be of use. Others may have better ideas and product links:
Pardon our interruption...
www.ebay.co.uk
Also these, which might be worth investigating:Does anyone have any suggestions about a bracket to enable me to turn the battery around please ?
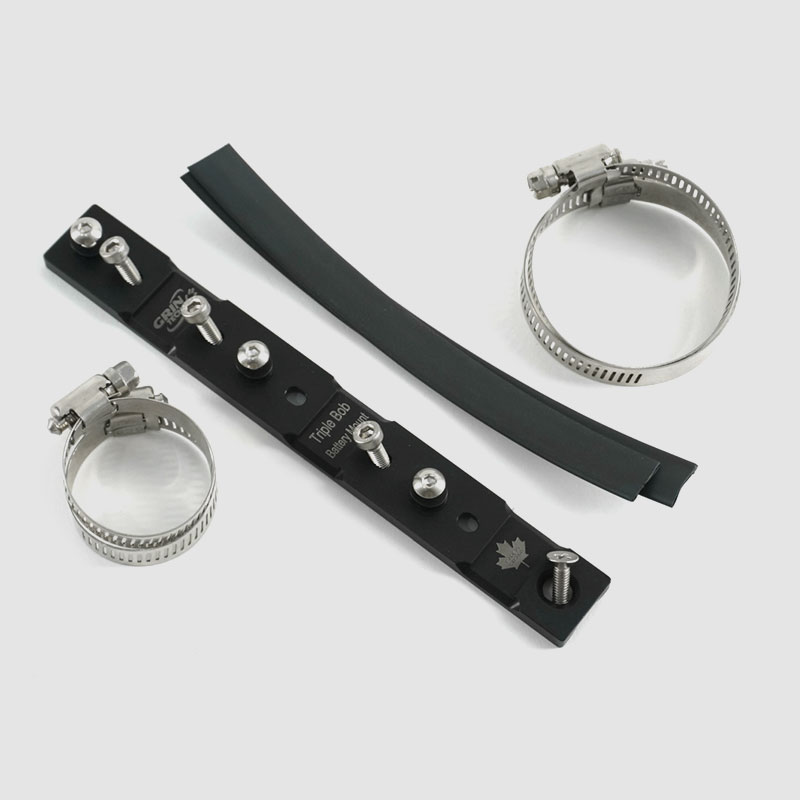
GRIN Bottle Bob Battery Attachment
If there are no eyelets on your frame, the Bottle Bob allows you to easily attach your battery to the frame triangle. The Bottle Bob comes with two…
Pardon our interruption...
www.ebay.co.uk
Thanks I’ll take a lookAlso these, which might be worth investigating:
GRIN Bottle Bob Battery Attachment
If there are no eyelets on your frame, the Bottle Bob allows you to easily attach your battery to the frame triangle. The Bottle Bob comes with two…www.ebike-solutions.com
Pardon our interruption...
www.ebay.co.uk
My bike frame has much less space than yours, so the battery is on the rear pannier rack by the way... but that shouldn't be necessary on your frame. The GRIN Tech solution looks the most secure to me - I'd be concerned that ziptied 3D printed blocks could allow a heavy battery to swivel while ridingThanks I’ll take a look
 All of the plastic clasps on my handlebars went totally wild and loose during a 4 mile ride in very heavy rain.
Last edited:
Yeah I agree with you , the only thing that puts me off on that one is the jubilee clips !My bike frame has much less space than yours, so the battery is on the rear pannier rack by the way... but that shouldn't be necessary on your frame. The GRIN Tech solution looks the most secure to me - I'd be concerned that ziptied 3D printed blocks could allow a heavy battery to swivel while riding
If the issue is mounting points on the frame and you don't mind drilling holes in it, then rivnuts might be the answer. They can be placed anywhere you can get a drill to.Does anyone have any suggestions about a bracket to enable me to turn the battery around please ?
Thanks, I’m going to look into that tooIf the issue is mounting points on the frame and you don't mind drilling holes in it, then rivnuts might be the answer. They can be placed anywhere you can get a drill to.
And if you can't get a drill into the right place, then it looks like a steel frame to me, so you could look at having additional mounts welded or brazed in place. Would need a bit of paintwork afterwards though.Thanks, I’m going to look into that too
If the bottle riv nuts don't line up re drill the fixing holes in the battery receiver/ bracket to align or as i have done I fitted a Wolf tooth B-rad bottle/tool roll mount so as not to drill the frame for new riv nuts. The B-rad comes in three lengths.
Wolf Tooth Components B-RAD Mounting Base - 3 Slot | Sigma Sports
The specs say only 1.7kg loading but an extra strap or velcro strap will help to secure the battery weight. It sensible to use extra support via a strap around the battery and down tube to take pressure off the riv nuts. On my Norco now dead as the seat tube weld snapped the factory riv nuts became slack.
That Wolf looks a stronger and better solution than this item I was wavering about wondering whether to suggest:If the bottle riv nuts don't line up re drill the fixing holes in the battery receiver/ bracket to align or as i have done I fitted a Wolf tooth B-rad bottle/tool roll mount so as not to drill the frame for new riv nuts. The B-rad comes in three lengths.
Wolf Tooth Components B-RAD Mounting Base - 3 Slot | Sigma Sports
The specs say only 1.7kg loading but an extra strap or velcro strap will help to secure the battery weight. It sensible to use extra support via a strap around the battery and down tube to take pressure off the riv nuts. On my Norco now dead as the seat tube weld snapped the factory riv nuts became slack.
Related Articles
-
 MTF Enterprises announces acquisition of EMU Electric Bikes
- Started by: Pedelecs
-
 Wisper 806T folding bike wins Which? ‘Best Buy’
- Started by: Pedelecs
-
 Sustrans calls for protected cycle lanes
- Started by: Pedelecs
-
 Amazon launch their first UK e-cargo micromobility hub
- Started by: Pedelecs
