E-Brompton - First Ride/Tweaks

jerrysimon

Esteemed Pedelecer
Aug 27, 2009
3,292
112
Cambridge, UK
Ok the bag arrangement is almost done. I will post some final pics later.

Given my uncertainty about what current being pulled from the battery I have also just ordered one of these


I thought about a Cycle Analyst but at just over £20 this will initially give me real time measurements of Volts, Amps, Watts and total Ah used.

Regards

Jerry
 
Last edited:

GROWLER

Finding my (electric) wheels
Jun 7, 2009
7
0
I use one of these Jerry and it is excellent value for money!Great build by the way!
Jonathan
 

jerrysimon

Esteemed Pedelecer
Aug 27, 2009
3,292
112
Cambridge, UK
I use one of these Jerry and it is excellent value for money!Great build by the way!
Thanks Jonathan. That's how I looked at it as they are pretty cheap and I think initially it will give me all the information I need.

Regards

Jerry
 
Last edited:

jerrysimon

Esteemed Pedelecer
Aug 27, 2009
3,292
112
Cambridge, UK
Ok I think I am almost done.

I have to say the electrics has been quite a challenge and taken much longer than I thought to sort out exactly how I want it. I have made it all modular so it can be taken apart and nothing is installed permantly in the bag. However I have used cable ties to ensure none of the connections are strained so won't pull appart unless the cable ties are cut.

First here is the controller all wired up


It looks like spagetti junction but everything is secured tightly. In terms of the Bulgin plug (the coned shaped plug with sivler gaffa tape on it) for the throttle and motor connection, I have yet to get a backing plate with a cable strain relieve, but for now this works. Its an eight pole connector so leaves me two spare if I want to connect the cutout brake switch later as well.

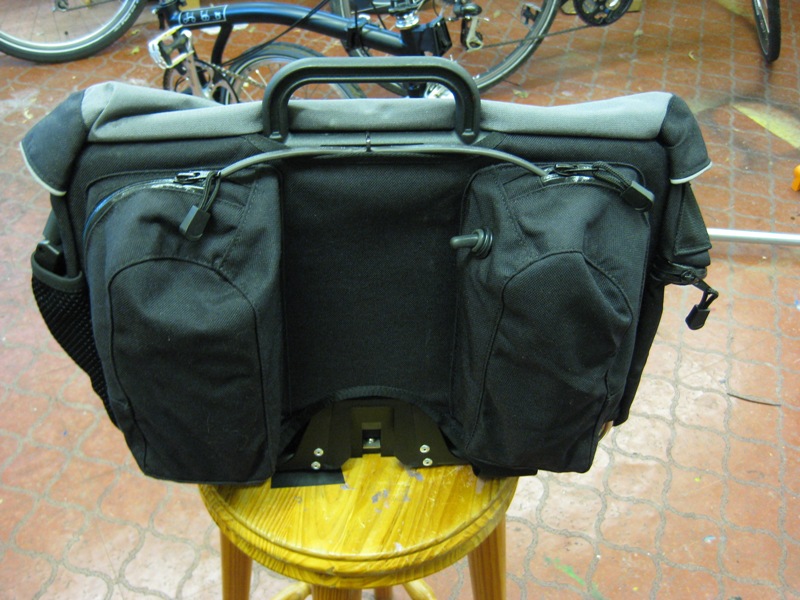
This all then goes in the right hand side of the bag securing the switch with a woodern backing plate and the water proof cover. I did think about putting it all in a plastic box, but I want the controller to be able to "breath" should it get warm.

Next the battery goes in the left hand pouch now fitted with a 10amp blade fuse as well. I may get another small pouch/case to put the battery in before it goes in the bag. Then when I take it out for charging at work, it doesn't look suspicious lol


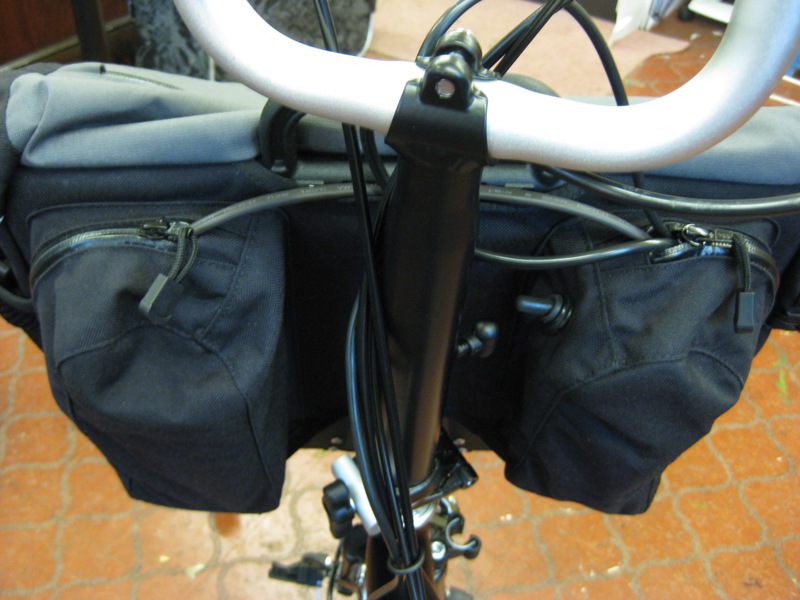
Finally here its what it looks like all installed in the bag

 
Last edited:

jerrysimon

Esteemed Pedelecer
Aug 27, 2009
3,292
112
Cambridge, UK
It installs on the bike using the Bulgin plug to connect bike controls to bag.


I got both plugs from Maplins and I think the smaller thinner profile square one on the bike is probably more discrete than the larger cyclinder round ones you can get. For now they connect well/firmly together the centre plastic insterts ensuring it only goes in one way. Getting the right pin to pin was fun!

Here is a pic of the square Bulgin male plug that remains on the bike.


And finally this is what it looks like before the switch is ready to flick up/On and ride off. I thought it more likely that the switch would get knocked down by accident, therefore in the down position everything is off.


When I get the Turnigy Meter I will connect it up so it is removable between the two pouches and sits in the middle just under the handle.

If the Bulgin sockets don't work, then I will probably move to either the Neutrick or Souriau connectors.

For now this has me up and running and overall I am pleased with the neat result :D

I have also sorted out the fold of the bike and will post some final pics of that later too.

Regards

Jerry
 
Last edited:

daniel.weck

Esteemed Pedelecer
Aug 8, 2009
1,229
2
Beautiful build Jerry, thanks for sharing !! :)
 

daniel.weck

Esteemed Pedelecer
Aug 8, 2009
1,229
2
Just came across this retailer for the Nano Brompton (kit from the Electric Wheel Company):

Brompton Nano Electric

(1500 GBP)
 

jerrysimon

Esteemed Pedelecer
Aug 27, 2009
3,292
112
Cambridge, UK
Interesting Dan thanks for the link. I think that is the new 28 hole Tongxin (Nano) motors they have sourced.

I need to tot up all my bills, but I reckon mine has cost around £1k including the new Brompton M3L and C bag.

PS I meant to add that my wife had a go on it yesterday and really liked it. I do have a spare full kit so I may have to build her one next as well lol

Regards

Jerry
 
Last edited:

Pedalo

Esteemed Pedelecer
Sep 10, 2009
443
1
Nice job Jerry and thanks for taking the time to report what you've done. I'm sure it will be really useful to others considering the DIY route.

It will be interesting to see between your Brompon and your Trek 7300 which becomes your weapon of choice over the next few months...
 

jerrysimon

Esteemed Pedelecer
Aug 27, 2009
3,292
112
Cambridge, UK
Nice job Jerry and thanks for taking the time to report what you've done. I'm sure it will be really useful to others considering the DIY route.

It will be interesting to see between your Brompon and your Trek 7300 which becomes your weapon of choice over the next few months...
Your welcome. I hope it has been useful for others. I have to admit I have become pretty addicted to this forum and posting updates on the project, but it all been part of the fun of doing it and getting advice from others as I go. Perhaps its time to back off posting so much though, as I fear sometimes I have over posted and people might get fed up with reading about my E-Brompton conversion.

Anyway I need to sort out the throttle. I am not happy with the current one on the right side as its too big and does not leave enough room.

I need to start another post on throttle recommendations lol

PS Re the continued use of the Cytronex I am not sure, we will see.

Regards

Jerry
 
Last edited:

daniel.weck

Esteemed Pedelecer
Aug 8, 2009
1,229
2
I want to hear about your throttle solution(s) Jerry :) It took me a few attempts before I reached a satisfying layout on my crowded handlebar ! :D I believe I found a reliable configuration that doesn't look too bad, but then my Brompton has got more gear levers and switches than yours, so you may not face the same complications...Let us know ;)
 
Last edited:

jerrysimon

Esteemed Pedelecer
Aug 27, 2009
3,292
112
Cambridge, UK
Ok a few final photos as its almost there :rolleyes:

I purchased the clip spacer to help the fold


The clip adds space and stops the shaft rubbing on the frame


Here it is folded. The fold in comporised by about an 30mm or so. I could cut the shaft to gain about 10mm, but as I said I don't want to risk it. The wheel also touches the floor because of the extra weight.

 
Last edited:

jerrysimon

Esteemed Pedelecer
Aug 27, 2009
3,292
112
Cambridge, UK
Handle bar layout almost finished. Added one cutout brake and moved throttle to the other side. I have a slimmer throttle coming and also need to sort out the grips with some decent bar ends maybe.


The wires need tidying up a little and the plug needs a home when its not in use.

Also got a proper backing plate for the female Bulgin.

 
Last edited:

jerrysimon

Esteemed Pedelecer
Aug 27, 2009
3,292
112
Cambridge, UK
Finally weights.

The bike wieghs 11.5kg from the factory. Bike with motor, heavier rim, extra cables, plug, brake and better tryes weighs 14.1kg which is managable.


With the bag and the battery its up to 16.9kg in the ready to ride state.


So that 14.1kg in one hand and 2.8kg in the other hand. Overall I am very pleased. Hope to start riding it to work everyday when the snow clears.

Been out for a quick spin to test the speed now I have a trip computer fitted. On the flat it does 14-15mph under motor power only :cool:


Regards

Jerry
 
Last edited:

shemozzle999

Esteemed Pedelecer
Sep 28, 2009
2,826
686
Hi Jerry,
Sorry to see the extension block does not do the job exactly as planned.
I see your shaft is longer than mine!!! If you want to measure the gap and give me the length of block you need I will make you a custom spacer f.o.c.
Contact me if your interested.
Regards, Colin.
 

jerrysimon

Esteemed Pedelecer
Aug 27, 2009
3,292
112
Cambridge, UK
Colin,

It kinda works but I have to use a spacer as shown. Its definately better than with no block at all fitted!

I wil measure up later and email you, a very kind offer. The right sized block will also mean I don't have to bend the mudguard wire either :)

The motor was slightly different than what I planned and had a roller brake bushing as you can see from the other posts.

Regards

Jerry
 
Last edited:

jerrysimon

Esteemed Pedelecer
Aug 27, 2009
3,292
112
Cambridge, UK
Colin's block that he kindly made bespoke sized for my project turned up today. Looks good and should enable me to fit the mudguard stay against the forks, rather than use a spacer nut and bend the stay wire.


I will post another pic when its fitted.

EDIT/UPDATE

In the end I went back to the first extension for the clip that Colin sent me, as I prefer to space the wire mud guard stay ring rather than having it against the fork lug with the main nut behind it. Maybe I should have used the original Brompton washer that is shaped to recess the stay wire and allow the nut to sit flush behind it, but I would then have to make the washer hole bigger for the new motor shaft and as I have a longer shaft anyway it was easier to go back to the original arrangement.

Thanks again though to Colin for helping me out, his standard extension block certainly makes things neater :D

Regards

Jerry
 
Last edited:

jerrysimon

Esteemed Pedelecer
Aug 27, 2009
3,292
112
Cambridge, UK
Well a couple of hundred miles later all seems to be going well. Its amazing how long it takes to finish things off. Just got my new GP1 grips yesterday which kinda finishes things off.

In the end I also went for a plain thumb throttle which is on the right and angled so my thumb can rest on it for constant cruising if need be.

The small A123 battery seems to be holding up well and cells are always with a few mV of each other. I haven't used the balancer since the first few rides as its not needed it seems. I just use the cheap fleabay 36V 1amp charger. I have ordered a second one to leave at work, although hopefully in the summer when I pedal more one charge will get me the 10 miles to work and back.

Anyway a few more final pics.

Grips fitted


As I said I went with a thumb throttle. I also fitted two cutout brakes as I feel safer with these. Had to move things about a bit to get it all right.

Dummy connector on bike to store the bike umbilical chord with 7 pin plug for throttle, motor and cutout brake connections.


Stowed on bike when not in use


The plug seems to be holding up.
 
Last edited:

jerrysimon

Esteemed Pedelecer
Aug 27, 2009
3,292
112
Cambridge, UK
I was also not happy about the water getting into the cable entry on the hollow motor shaft, so have sealed it up with some mastic. Probably more a problem in the rough winter weather though. The recent milder weather is VERY welcome.

Motor with waterproofing for cable entry


Also shown is the switchcraft connector. Used by Cytronex and providing a waterproof connector to ease things when you have to take the wheel off. They finish things off well but are a bugger to fit requiring fine soldering skills on the little pins. Only rated to 7.5amps/pin so limited application I guess.

Also If you have to take off shaft washers and nuts, it would need to be unsoldered which would be a real pain. If I do ever have to do this I will replace it with a plug that has pins that could be removed from a plug to fit through washers and nut.

Oh also Marathon Plus tyres back and front now. Extra weight but almost puncture proof piece of mind hopefully.

Anyway maybe another update mid/late summer.

Regards

Jerry
 
Last edited:

jerrysimon

Esteemed Pedelecer
Aug 27, 2009
3,292
112
Cambridge, UK
Maybe a Moulton next lol

PS

I been looking at Moultons. The older F frame ones like this MK III.


Full suspention back and front. I love tinkering in my shed, maybe a project for next winter :rolleyes:


Regards

Jerry
 
Last edited: