8Fun Kit Mod to 48V

manalog

Pedelecer
Mar 25, 2013
65
0
Hi,
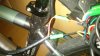
I'm trying to convert my 8fun kit to 48V is this possible without killing the original Controller. I think the Controller is a KU63.

My Plan is to use 2 11V Laptop Battery in Parallel to give me a total capacity of10AH and wire it up in series with the Main Battery. I remember reading about this somewhere but I can't find the Thread but I think he was trying to convert to 44V if I remember correctly.
Thanks in advance,
Gerry
 

amigafan2003

Esteemed Pedelecer
Jul 12, 2011
1,389
139
KU63 controllers have 63v caps so 48v is no problem. I've run 15s lipo on one (55.5v nominal, 63v fully charged) with no issues).

Obviously you'll have the wrong lvc for a 48v battery though so have a think if you need to have some other way of protecting the battery from low discharge.
 

manalog

Pedelecer
Mar 25, 2013
65
0
KU63 controllers have 63v caps so 48v is no problem. I've run 15s lipo on one (55.5v nominal, 63v fully charged) with no issues).

Obviously you'll have the wrong lvc for a 48v battery though so have a think if you need to have some other way of protecting the battery from low discharge.
I'm thinking of running an extra 11V 10AH with the original 36V 9AH Bottle Battery without a BMS on the 11V and make sure the main battery doesn't go below half charge, is this an acceptable method to protect a non BMS pack for the time being?
By the way, where can I get a BMS and which one? there seems to be different types.
 
D

Deleted member 4366

Guest
The 8Fun kit has an 8Fun controller, not a KU63. The KU63 is the one that comes from BMSBattery. You'll probably be OK with the 8Fun one, but be prepared to bu a new controller at £20 to £30.

The laptop batteries should have the maH written on them. Together they need to add up to at least 8800maH. Also, you need to check the discharge rate of the cells. Some of the higher capacity ones don't have a high enough discharge rate. Most laptop batteries have a PCB inside that checks and controls temperature, discharge rate and other things. You need to bypass that because you could get the situation where one pack got shut-down by the PCB, which would then over-discharge the other one. The best solution is to break open the plastic case and remove the cells. You can then check the designation of the cells and look up their data sheet to see if they're suitable.

Finally, you need to monitor the cell voltages carefully in real-time while you're riding the bike, otherwise they'll soon be scrap, which means using a lipo monitor with an extension lead so that you can see what's happening.
1S-8S RC Lipo Battery Low Voltage Alarm Buzzer Indicator Meter Checker Tester UK | eBay
 

manalog

Pedelecer
Mar 25, 2013
65
0
The 8Fun kit has an 8Fun controller, not a KU63. The KU63 is the one that comes from BMSBattery. You'll probably be OK with the 8Fun one, but be prepared to bu a new controller at £20 to £30.

The laptop batteries should have the maH written on them. Together they need to add up to at least 8800maH. Also, you need to check the discharge rate of the cells. Some of the higher capacity ones don't have a high enough discharge rate. Most laptop batteries have a PCB inside that checks and controls temperature, discharge rate and other things. You need to bypass that because you could get the situation where one pack got shut-down by the PCB, which would then over-discharge the other one. The best solution is to break open the plastic case and remove the cells. You can then check the designation of the cells and look up their data sheet to see if they're suitable.

Finally, you need to monitor the cell voltages carefully in real-time while you're riding the bike, otherwise they'll soon be scrap, which means using a lipo monitor with an extension lead so that you can see what's happening.
1S-8S RC Lipo Battery Low Voltage Alarm Buzzer Indicator Meter Checker Tester UK | eBay
That's interesting I thought my controller was a KU63! Thanks for that, I have opened it up and it has one large Capacitor which says 63V on it. I think what looks like a Shunt is in the middle of the board and it has 7 Mosfets. Is the KU63 OK with 48V or do I need to buy the KU65?

I have dismantled the Laptop packs and removed the PCB/BMS the batts are Samsung ICR18650 26C. They are wired up 3s2p so made up 2 packs in parallel to make up the capacity to at least 10AH I now have 3s4p configuration with a balance connector but no BMS.

I have a LV alarm buzzer but I'm not sure how to wire it up, it looks like the one on the link.
Many Thanks,
Gerry
 

manalog

Pedelecer
Mar 25, 2013
65
0
This is the battery spec, it looks like they are not suitable and I was offering some to KirstinS who inspired me to this modification but had trouble with the booster pack.

Nominal Capacity 2600mAh (0.2C, 2.75V discharge)
 
D

Deleted member 4366

Guest
Your controller should be OK at that voltage. The KU63 and KU65 have the same ratings. The KU65 has a panel where you can get three levels of PAS, which is better than getting full PAS all the time. I think your 8Fun controller has the same panel. You don't need to get a new controller yet because your present one will probably be OK.

The alarm is easy to wire: One of the end pins is 0v ( should be marked - might say "+" at the other end). The negative side of the first cell in your 3S pack goes to that first pin, then the positive side to the next pin, then the next positive, and then the final positive. Leave the other pins disconnected. Make an extension lead so that you can have the display on your handlebars.
 
D

Deleted member 4366

Guest
The cells are good. They're for tools, electric bikes etc. You can get 5 amps max from each one, although half that would be better for them, so you need at least four in parallel (3s4p). I think the 0.2c rate you mentioned is the charge rate, so you charge the pack/strings at 2 amps.
http://www.meircell.co.il/files/Samsung ICR18650-26C.pdf
 

manalog

Pedelecer
Mar 25, 2013
65
0
Your controller should be OK at that voltage. The KU63 and KU65 have the same ratings. The KU65 has a panel where you can get three levels of PAS, which is better than getting full PAS all the time. I think your 8Fun controller has the same panel. You don't need to get a new controller yet because your present one will probably be OK.

The alarm is easy to wire: One of the end pins is 0v ( should be marked - might say "+" at the other end). The negative side of the first cell in your 3S pack goes to that first pin, then the positive side to the next pin, then the next positive, and then the final positive. Leave the other pins disconnected. Make an extension lead so that you can have the display on your handlebars.
I'll give it a go this afternoon as soon as the pack is fully charged and report back. Thanks Dave
 

manalog

Pedelecer
Mar 25, 2013
65
0
Wowwwww....!!!! Just tried with the 11V Booster pack, I'll say this is how an E bike should perform.

Initial pack voltage was 12.5V, now the reading is 12.3V and the cells were 4.15V now 4.13V hopefully I wont loose a cell or 2 tomorrow.

Unfortunately, my bike computer is broken so I can't tell how fast I was going but it was a blast. I did a couple of hills with no problems the cells never went below 4Volts and no overheating.

I will be doing a 12mile commute tomorrow and I'll let you know how I get on.

Cheers,
Gerry
 
D

Deleted member 4366

Guest
Could you take some photos to explain how you wired it because I think other people are interested in how to do it.
 

manalog

Pedelecer
Mar 25, 2013
65
0
Today's commute was 12miles. initial booster pack voltage was 12.3 and the lowest cell was 4.03. Now, they are 12.0V and 4.0V respectively. I currently have no pedal sensor so this is purely throttle only. Again no overheating and no loss of power.

I'll see if it will do another 12 miles this evening if not I'll increase the capacity ti 12.5AH I have set the buzzer to 3.4V is this OK?

Thanks,
Gerry
 
D

Deleted member 4366

Guest
3.4v is OK. Until you recognise the voltage behaviour of the booster pack, just keep an eye on the voltage monitor, After a few charge cycles, you'll know what they do. I wouldn't rely on the beeping alarm.
 

manalog

Pedelecer
Mar 25, 2013
65
0
Will take some photos when I get home.
I will upload some pics later, my Camera is misbehaving at the moment.
This is what I did
11V 56WH Laptop Battery 2X from a Junk Laptop
Imax B6AC Charger 1X Amazon £27
Multimeter
1-8S Voltage buzzer £3.00
3S Balance Leads 1X 99p
16Amp Wires Blk and Red
Soldering Iron
Heatshrink sleeves 99p
Bullet Connectors
Electrical Tape
Screw Driver
Scissors
Side Cutters

Open the Laptop Battery pack carefully using a screw driver and pry gently
Disconnect the BMS PCB, be careful when cutting the wires watch out things can short out.
Use a Voltmeter and locate the 0V and +11.1V this should read at least 12V if the battery has
been pre-charged
Locate the +3.7 V and the +7.2V

0V
+3.7V
+7.2V
+11.1V

These batteries are Samsung 2600mAH and the are configured as 3S2P this is an 11V 5.2AH Battery pack.
To make at least 11.1V 10AH pack I connected 2 packs in parallel using 16Amp wires
I also added the 3S balance wire, see url R/C Calculations.
I also added a Voltage monitor as advised by D8veh as I don't have a BMS.

I have soldered all the connections as above and charged the pack at 2.5Amps (not sure if I can increase the charge rate)

I connected the pack in series with the 36V Bottle battery and connected the voltage monitor so that I can see if the cells are OK

I have done a 24mile return commute today on throttle only and it has performed well, I am very happy. Thanks to D8veh and the others who helped me with this project.
 
D

Deleted member 4366

Guest
Thanks for that nice explanation. When I broke up my laptop batteries, it was very difficult to break open the case. 2.5aH is OK as a charge rate, but don't go any higher. The recommended rare is 0.2c, which would be 2amps, but many ebikes charge the same cells in 10s4p configuration at 2.5amps.

For anybody else interested in doing this, which works on virtually any bike with hub-motor, you can get job-lots of used laptop batteries from Ebay, or try your local recycling centre. Wghen I got some, virtually all the cells were good, but you need to test them. The Imax charger can do a discharge test as well as charge, to verify them.

http://www.ebay.co.uk/sch/i.html?_trksid=p5197.m570.l1313.TR0.TRC0&_nkw=job+laptop+batteries&_sacat=0&_from=R40
 
Last edited by a moderator:

manalog

Pedelecer
Mar 25, 2013
65
0
Here are the Pictures.
DSC_2810.jpg
I used a screw driver to open the pack very carefully and pry gently.
DSC_2812.jpg
I carefully separated the PCB/bms by cutting all the wires
DSC_2815.jpg
I checked the voltages where the wires were so I can connect the Lipo balance wire and the output wires.
DSC_2817.jpgDSC_2816.jpg

Here is what I made earlier with all the wires soldered. I hope it all make sense but have a look at this URL on how to connect the balance wires R/C Calculations
DSC_2821.jpgDSC_2818.jpgDSC_2819.jpgDSC_2820.jpg

This is the original Battery connection to the Controller
DSC_2822.jpg

I then cut this wire and inserted the 11V Booster pack in series.DSC_2823.jpgDSC_2827.jpgDSC_2826.jpg

Here is the finished product. Well not quite I plan to put everything in a bag on a pannier rack.
DSC_2829.jpgDSC_2828.jpg

Cheers,
G
 

manalog

Pedelecer
Mar 25, 2013
65
0
Quick question, what happens when the bike is travelling more than the maximum speed of the Motor, does it take current from the batts? Im just wondering because I did around 50 miles before I added the 11V Booster. Most people say a 36V 10AH range is only around 25miles, bearing in mind I m using throttle only and will sometimes push and leave the throttle on max even when I was travelling at more than 15mph.