8 fun bikes, review of customer service

Alec67

Finding my (electric) wheels
Sep 23, 2012
12
0
Hello,

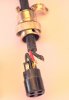
Advice please. I bought a battery from 8funbikes about 18 months ago, and last week my bike fell over and the wire into the connector to the battery broke in such a way I could not repair. I contacted 8fun with photo of part and they sent me a new connector with a 'short; length of wire, total cost £15.00.

After assembling, the light on the throttle was intermittent and tracing it back I dismantled the new connector and found one of the wires had been badly soldered and had come adrift.

I contacted 8fun with a photo showing new connector with problem and original connector as well . I received an email which said;

"Sorry about this but could you please send it back,

I don't have this brand new part. what I can do is to repair this one."


I cannot help but conclude that this is not exactly good service, would others agree, if not, what do you think I should be asking for.

Thanks for any comments opinions
 

eddieo

Banned
Jul 7, 2008
5,070
6
At least they are still operating and prepared to get you back on the road.....
 

Old_Dave

Esteemed Pedelecer
Sep 15, 2012
1,211
2
Dumfries & Galloway
Where abouts are you Alec, send it to me with a stamp for the return postage and I'll fix it for you
 
D

Deleted member 4366

Guest
I think it's good service that they offered to repair it for you. I wouldn't try and attribute the bad soldering to them. These parts are standard cheapo Chinese parts with variable quality that could be on a lot of ebikes. They're not made by 8Fun. If you want guaranteed quality and unlimited supply of spare parts, then you should expect to pay a lot more than you did. You knew at the time that you were buying a low-cost solution, but, even for that, the support is still reasonable/good.

A warning to anyone: When you buy the cheaper stuff, you must expect the odd wire to come adrift. The quality controls and manufacturing process controls for these things are not sufficient to guarantee quality. Thankfully, it seems to be gradually improving and now seems to affect mainly ancillary items rather than motors and controllers. Buying more expensive does not guarantee quality either. Often it's the same stuff with higher mark-up, but with maybe better support. Best is to learn to solder and fix things yourself - saves a lot of hassle, plus you can often improve on what you get to get better reliability.
 

the_killjoy

Esteemed Pedelecer
May 26, 2008
822
226
I must agree I think they are trying to be helpful, at least they are answering your email :)
 

KirstinS

Esteemed Pedelecer
Apr 5, 2011
3,224
899
Brighton
for tuppence I think their service is very good. Paul Cao responded to all my emails very promptly and sent me replcement parts very fast. He also agreed to send 2 parts knowing only one was faulty but not which it was. This was done at not cost as I'm under warranty. He left me to send the part I did not need back. I have not yet done so - this makes him good at customer service and me a bad customer

I had geniunely forgotten so will rectify this this now
 

Alec67

Finding my (electric) wheels
Sep 23, 2012
12
0
Where abouts are you Alec, send it to me with a stamp for the return postage and I'll fix it for you
That's a very kind offer Old_Dave, as the part is now in pieces, and having thought about the replies, I think I will buy myself a soldering kit and learn my own maintenance. Any advice on soldering the part / wire shown would be appreciated,

DSC_0318-001.JPG

Thanks for other replies, as you say, maybe I just should be grateful that I got any offer of service at all.
 

flecc

Member
Oct 25, 2006
53,361
30,710
If you enter "how to solder" into Google, you'll get many guides and videos on doing it. Keeping the connector body held still while soldering can be awkward if you know no ready way, but using a pair of pliers and an elastic band on the work surface is a simple way of doing that as shown here:


Scimitar

Esteemed Pedelecer
Jul 31, 2010
1,772
40
Ireland
Well, considering the often shabby customer service you can get from some of the cheap suppliers (ranging from ripping you off to simply ignoring you once they've got your money and sending sub-standard goods) I think 8-fun came through quite well in this instance. If your 15 quid all-up included postage, well that's just something we have to live with. Otoh, 15 pounds for a simple connector (if not including postage) is a bit much - so, was it with or without P&P?
I've generally heard good things about 8-fun, but of course, you can get the odd situation that's a snafu all around and a business on the other side of the world, where English is not their first language, can be sometimes awkward to deal with.
Some of the other companies are a lot worse, but most of them eventually supply what you pay for in the end. The Chinese kit I bought is well out of warranty now, so if I blow it up I just have to accept the cost of repair or replacement. I must admit, I was keeping my fingers crossed for the 1st year anyway :)
 

jackhandy

Esteemed Pedelecer
May 20, 2012
1,820
323
the Cornish Alps
. Any advice on soldering the part / wire shown would be appreciated,


There's usually a bit of clear plastic sleeve to slip over the soldered pins, to stop shorting to the plug body:

If it's not there, wrap a bit of insulation tape round them before reassembling the plug & Avoid Any Blobs - Blobs is BAD :p
 
D

Deleted member 4366

Guest
That's a very kind offer Old_Dave, as the part is now in pieces, and having thought about the replies, I think I will buy myself a soldering kit and learn my own maintenance. Any advice on soldering the part / wire shown would be appreciated,

View attachment 4233

Thanks for other replies, as you say, maybe I just should be grateful that I got any offer of service at all.
Here's how to do it.

As Flecc advises, it's important to keep things still. You can't get a good joint if your chasing it round the table with the soldering iron.
Strip back a couple of mm of the wire; heat it up with the soldering iron being careful not to touch the plastic insulation; after a couple of seconds, dab a bit of solder on the wire, whilst keeping the iron on; keep the iron on for a few seconds more as you see the solder soaking into the wire; add just enough solder that you can't see the strands of the wire any more; always leave the iron on for a few more seconds after you add solder to make sure you reach bonding temperature.
Heat up the pin and add a small amount of solder; keep the iron on for a few more secs. [If it were a big pin/contact, you'd have to heat it up a lot more with a blob of solder on the soldering iron, wiping it until you see that the solder sticks to the surface and isn't just sitting as a blob].
Bring the wire to the pin and re-melt the solder with the iron; leave the iron on for a couple of secs to make sure it's up to temp.

Normally I'd use a bit of heatshrink as well to give a bit more support to the joint. You thread a short piece of the right dia. heatshrink up the wire before soldering - making sure that it stays well clear while soldering. Once the joint is made, slide the heatshrink over it and use the body of the iron (the bit next to the tip) to heat up and shrink the heatshrink sleeve, being careful not to touch it hard enough to melt it.

When dealing with plastic connectors, you're often trying to balance the the heat to get a good solder joint against the risk of melting plastic, so try to be purposeful. Don't faff about keeping the iron on for any longer than necessary. The heat travels up the pins and melts the plastic - no problem if you do it in one go, but each time you repeat, more heat travels along towards the plastic, so better to let everything cool down and start again.

The mistakes that most people make are:
1. Not looking at the joint afterwards to check that the joint is good visually
2 Not leaving the iron on the joint long enough after adding solder. It's not enough just to melt the solder on like glue. You have to get it up to about 370 deg c to make a good joint, which is approximately double its melting temperature
3, Waving the soldering iron around like a magic wand. Try and keep it still on the joint before and after adding solder, Only move it to get better access to the joint.
4. Not allowing enough time for big contacts/wires to heat up. Melted solder helps transfer heat, so always start with a blob on the iron and keep checking that the solder is properly wet as opposed to blobby. The meniscus should change from convex to concave -sort of.

Finally, all what I've said are guidelines. It's not an exact science. You have to adapt sometimes depending what's in front of you. practice makes perfect.
 

Old_Dave

Esteemed Pedelecer
Sep 15, 2012
1,211
2
Dumfries & Galloway
5. Blowing on the soldered joint is so totally a waste of time


Sent from my iPhone using Tapatalk
 

Alec67

Finding my (electric) wheels
Sep 23, 2012
12
0
Here's how to do it.

As Flecc advises, it's important to keep things still. You can't get a good joint if your chasing it round the table with the soldering iron.
Strip back a couple of mm of the wire; heat it up with the soldering iron being careful not to touch the plastic insulation; after a couple of seconds, dab a bit of solder on the wire, whilst keeping the iron on; keep the iron on for a few seconds more as you see the solder soaking into the wire; add just enough solder that you can't see the strands of the wire any more; always leave the iron on for a few more seconds after you add solder to make sure you reach bonding temperature.
Heat up the pin and add a small amount of solder; keep the iron on for a few more secs. [If it were a big pin/contact, you'd have to heat it up a lot more with a blob of solder on the soldering iron, wiping it until you see that the solder sticks to the surface and isn't just sitting as a blob].
Bring the wire to the pin and re-melt the solder with the iron; leave the iron on for a couple of secs to make sure it's up to temp.

Normally I'd use a bit of heatshrink as well to give a bit more support to the joint. You thread a short piece of the right dia. heatshrink up the wire before soldering - making sure that it stays well clear while soldering. Once the joint is made, slide the heatshrink over it and use the body of the iron (the bit next to the tip) to heat up and shrink the heatshrink sleeve, being careful not to touch it hard enough to melt it.

When dealing with plastic connectors, you're often trying to balance the the heat to get a good solder joint against the risk of melting plastic, so try to be purposeful. Don't faff about keeping the iron on for any longer than necessary. The heat travels up the pins and melts the plastic - no problem if you do it in one go, but each time you repeat, more heat travels along towards the plastic, so better to let everything cool down and start again.

The mistakes that most people make are:
1. Not looking at the joint afterwards to check that the joint is good visually
2 Not leaving the iron on the joint long enough after adding solder. It's not enough just to melt the solder on like glue. You have to get it up to about 370 deg c to make a good joint, which is approximately double its melting temperature
3, Waving the soldering iron around like a magic wand. Try and keep it still on the joint before and after adding solder, Only move it to get better access to the joint.
4. Not allowing enough time for big contacts/wires to heat up. Melted solder helps transfer heat, so always start with a blob on the iron and keep checking that the solder is properly wet as opposed to blobby. The meniscus should change from convex to concave -sort of.

Finally, all what I've said are guidelines. It's not an exact science. You have to adapt sometimes depending what's in front of you. practice makes perfect.
I really appreciate this, especially .."so try to be purposeful. Don't faff about"..

That's the bit I shall have to work really hard at !!