Torque arm challenges

103Alex1

Esteemed Pedelecer
Sep 29, 2012
2,228
67
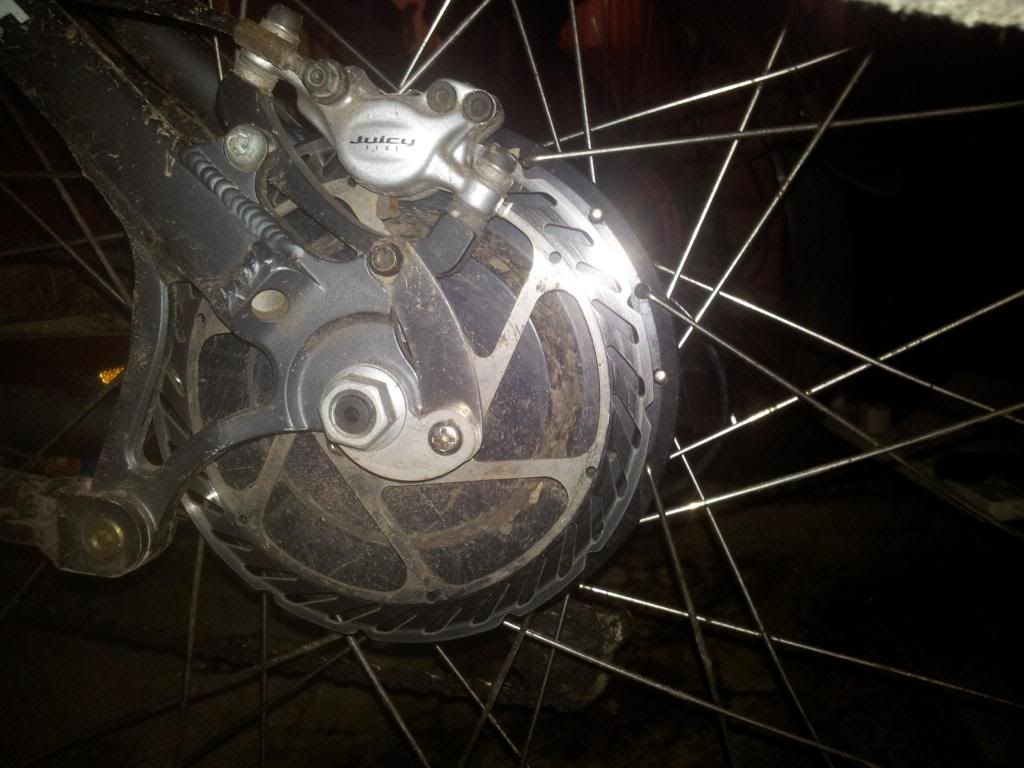
I knew these were going to be a bit of a b'stard ... been playing about to see what can be done. Arms are M12 from BMS. The bike is upside down with the motor axle slotted in the dropouts. Axles aren;t the longest for adding these in :eek:

1st appraisal - drive side.

20130120_031358[1].jpg

A full swing to frame fixing point with a clamp would look like this. This is within the dropout section before the weld to the main frame and so would be trying to fix around some relatively narrow bits of metal. Would that be safe ?

20130120_033305[1].jpg

Not sure about whether optimal plane in any way but advantage of this approach is that I could grind off some of the rack housing (shown held in place with an alum key) to just fit the rack in to the spare hole. It's very tight though.

2nd appraisal - non-drive side.

This is a bit of a b***** owing to the frame design in the dropout area and the dropouts being completely vertical. Great for everything else, not so great for options with this torque arm. Nonetheless .....

aligns like so ... I have removed the rack - mount hole is the spare one as here :

20130120_030726[1].jpg

It will pivot to the rack fixing hole (drilling out required) :

20130120_025010[1].jpg

... but this means rack goes which isn't really an option on this build.

It will also pivot to the lowest hole (uppermost when bike is upright) - which means attaching through the same hole as is being used for brake mounting (mocked up here) :

20130120_024834[1].jpg

... but this again interferes with the rack mount hole and likely would lead to some extensive grinding away of the rack fitting. Perhaps too much for it to still be strong enough. It's very borderline.

Hope I've oriented the torque arm right ... :confused: are any of these options not recommended technically ? Whichever way I go with this it seems quite a bit is going to be needed to get these torque arms to fit without losing option for a rack. The least work would seem to be drive-side fit as in 2nd photo above which only involves grinding away a very small bit of rack mount block. But I am a bit worried about my frame and whether it's OK to fix here with a clamp.
 
D

Deleted member 4366

Guest
I showed you how to do it with photos of my bikes. Don't make it any more difficult than it needs to be.
Remove that bottom black disc caliper hex screw;
You might want to bend a slight joggle in the arm to make the surfaces level. It should pull into the joggled shape when you bolt it up anyway;
Swing the arm over the hole and mark the hole position accurately;
Centre-punch the hole cente - nice and deep otherwise the drill will walk out of position;
You'll need properly hard drills to drill it. Your average cheapo drill set from the DIY shop won't touch it. Drill the hole. I normally do it in two stages 3mm and 6mm, and use a bit of oil as a lubricant;
Check that the screw goes in. You can make small adjustments with a Dremmel grinding tool;
Cut/grind the end off (optional) with an angle grinder;
Screw the bolt back in;
Job done!

If it goes wrong, you can make the tie-bar out of any piece of mild steel about 2 to 3mm thick. It's a lot easier to drill than that stainless.. You just need to drill a hole each end.
 
Last edited by a moderator:

BAH48

Pedelecer
Nov 6, 2012
166
15
Appleby Cumbria
Drilling SS is difficult, I use Heller cobalt drills from Toolstation - about £3 for a 6mm. As d8veh says - always drill a smaller hole first.
 

Fordulike

Esteemed Pedelecer
Feb 26, 2010
3,802
1,538
You could always buy a torque arm from Cycleezee:

Shop - electric bikes and conversion kits

2012-12-08-143.jpg2012-12-08-141.jpg

They have a lot more scope for adjustment, and may fit on your bike where I've fitted mine.
Mine are attached to the frame at the rack mounting and I think I used either an M5 or M6 bolt.
They are made from stainless steel and are very robust torque arms.
 

103Alex1

Esteemed Pedelecer
Sep 29, 2012
2,228
67
I showed you how to do it with photos of my bikes. Don't make it any more difficult than it needs to be.
Yes thanks for that d8veh. It's the last photo above and was actually the 1st option I tried. Even if you grind away and round off around the torque arm fixed in that point like in your photo, it looks like it'll pretty much obstruct the rack mount hole too on account of their relative positions on this particular frame. Will go back and try it again today but it didn't really look workable there last night in context of other bits to be fitted.

You could always buy a torque arm from Cycleezee:

Shop - electric bikes and conversion kits

View attachment 4884View attachment 4885

They have a lot more scope for adjustment, and may fit on your bike where I've fitted mine.
Mine are attached to the frame at the rack mounting and I think I used either an M5 or M6 bolt.
They are made from stainless steel and are very robust torque arms.
Thx - was looking at those earlier - they do look good (potentially no grinding / drilling). Can probably get away with only using one. However, disc brake pannier rack mounting hole pretty much goes out the window I think. As that hole is so close to the brake caliper hole, even mounting there may result in loss of adjacent mount hole use. That is basically what I'm trying to avoid.
 

103Alex1

Esteemed Pedelecer
Sep 29, 2012
2,228
67
Had another look and it's definitely going to be down to whether I can regain full use of my rear rack mount holes whether project proceeds with this bike and kit. Seatpost rack is not strong enough to substitute a proper rear rack for intended use - and as I have a full carbon seatpost that would also probably mean a new seatpost anyway.

Torque arm is going to have to be drilled and cut to see if it means the rack mount function can be saved for cert before I go any further so have put the rest of it on hold.

Plan B is sell bike and get a cheaper 2nd hand hybrid bike with rim brakes more suitable for accommodating kit and extra fittings to make the bike really useful. There's a police auction viewing tomorrow. It's tempting.

Plan C is sell bike, parts and battery on in mint condition and buy a ready-built designed for intended use. That'll likely cost me another £800 so might not be possible.

Plan D is ditch the whole shebang, sell all the bikes and go somewhere hot for 6 months with the money. It's pretty darned tempting ;)
 

amigafan2003

Esteemed Pedelecer
Jul 12, 2011
1,389
139
Why can't you use the rack mount for a rack if you use it for the torque arm?

Just use a longer bolt that secures both the torque plate and the rack stay.
 

wurly

Esteemed Pedelecer
Aug 2, 2008
501
9
Yeovil, Somerset
Can you turn the slotted bit around and fix it without the extension part of the torque arm?
This is how i fitted my torque arm to my Marin bike.

I just drilled a hole in the frame and tapped it for 5mm.
 

103Alex1

Esteemed Pedelecer
Sep 29, 2012
2,228
67
Why can't you use the rack mount for a rack if you use it for the torque arm?

Just use a longer bolt that secures both the torque plate and the rack stay.
Like this ... ?

20130120_182110[1].jpg

That would work if it's not going to transfer tension to the rack stay and affect / overload the bolt (hadn't thought it through but what was in back of mind that couldn't have dual use for some reason :rolleyes:).

The Cyclezee arm would likely not even require drilling and grinding, but wouldn't be as neat as you'd be left with the long protrusion of unused arm. I guess if you cut that down your bolt would be fixing a 'fork' extension rather than a solid plate with long groove cut out for adjustable fixing.

They do say you can't teach common sense :eek:. Trying my best with this - am no engineer !
 
Last edited:

103Alex1

Esteemed Pedelecer
Sep 29, 2012
2,228
67
Can you turn the slotted bit around and fix it without the extension part of the torque arm?
This is how i fitted my torque arm to my Marin bike.

I just drilled a hole in the frame and tapped it for 5mm.
Doesn't seem to work for vertical dropouts with these torque arms. :confused:. Might have aligned just right with horizontal ones. If I can get away with not drilling the frame would rather do that.
 

103Alex1

Esteemed Pedelecer
Sep 29, 2012
2,228
67
Well, dropped off the torque arm to be cut, drilled and kinked for me. At the moment I don't have an electric drill, grinder or clamp and have even managed to mislay the hammer :rolleyes: .. so it seemed the sensible thing to do to keep things moving in the right direction. Was quoted £20 cash and about a week's wait which I can live with as hopefully will save some money on the bike box versus a bag :). Must get to grips with some proper versatile tools and basic work setup :confused: ... get all fired up and ready to go and still trying to get set up with basic equipment. To be investigated further !

Hope I've marked the arm up accurately enough. Getting the hole marked was a wee bit tricky. I had the torque plate clamped in place on the axle of the built wheel in the dropouts to make sure it was exactly as it would be. In the end I found an old bottle of tip-ex from the days we actually used it which was still fluid enough to mark. Broke off the foam tip for a solid end profile, cut the plastic dabber down to insert into the hole from behind (between motor and frame) and inserted with the torque plate clamped firmly in place on the axle. Nice white dot marked the spot and marked the profile of the retainer arm to be cut off to follow the contour of the frame too.

The machining company also sold me a nice long bolt with a retaining nut sufficient to go through rack mount, torque arm, frame and retain from the other side with a nut and washer for pennies.

Fingers crossed.